Automatically posting a blog post to Facebook used to be a challenge. The idea was simple, which is to notify Facebook that you have a blog you want posted on your wall, and the social media will do as you command. The implementation, however, was more complicated than that.
Even with Facebook's post-by-email feature, only the blog name and title will appear on the wall, leaving behind the content or link. There are other plugins available, but they don't work as straightforward as they're supposed to be. There is always something missing.


Now, IFTTT will take you through a mini-tutorial - click on the word 'this', 'that' and 'Continue' button several times. Finally, select 3 channels that interest you and click 'Continue' to finish with the registration.
To get started, click the 'My Recipes' link and then click the 'Create a Recipe' button, as shown below:

Start creating the recipe by clicking the blue 'this' word and select a "trigger channel". The trigger you need to choose is Blogger - search for it in the box, as illustrated below:

After our Blogger blog has been connected, 'Choose a Trigger' that allows you to specify what kind of posts will be published to Facebook. You can choose 'Any new post' or 'New posts labeled'.

Finally, press the blue 'Create Trigger' button to proceed to the next step.


To set up 'that', click on the blue-colored 'that'. This will bring up a window that contains a list of social media sites. Search for 'Facebook' in the box and select the 'Facebook Pages' option (select the plain 'Facebook' option if you want to post to your personal profile).


Hit the 'Done' and 'Continue to the next step' buttons and we're almost done...
You will be prompted to 'Choose an Action', where you get to specify if you only want to 'Create a status message', 'Create a link post', or 'Update a photo from URL'. Choose 'Create a link post' as shown below:

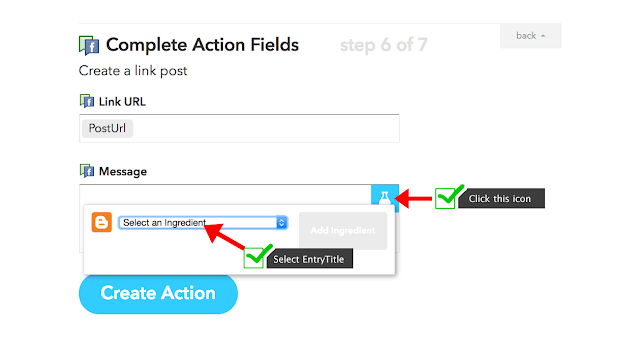
If you are unsure of what each ingredient does, please visit this page.

To complete your recipe, hit the 'Create Recipe' button.
And that's it! This is how IFTTT recipes are created. Next time you publish a Blogger post, it will be automatically shared to Facebook.
Even with Facebook's post-by-email feature, only the blog name and title will appear on the wall, leaving behind the content or link. There are other plugins available, but they don't work as straightforward as they're supposed to be. There is always something missing.
How to Share Blogger post automatically to Facebook using IFTTT
Here is an online utility IFTTT (If This, Then That), which is capable of moving social postings between sites. Setting it up is fairly easy, and just as easy to use. So, let's see how we can share Blogger posts automatically to Facebook using IFTTT.Step 1. Sign up for a free IFTTT account
Visit IFTTT.com and set up an account by creating a username and password.Now, IFTTT will take you through a mini-tutorial - click on the word 'this', 'that' and 'Continue' button several times. Finally, select 3 channels that interest you and click 'Continue' to finish with the registration.
Step 2. Create a new recipe
Once registered, we need to 'Create a Recipe'. A recipe is basically the process of combining two platforms together - in our case, we will combine Blogger with Facebook. This shouldn't take more than five minutes.To get started, click the 'My Recipes' link and then click the 'Create a Recipe' button, as shown below:
Start creating the recipe by clicking the blue 'this' word and select a "trigger channel". The trigger you need to choose is Blogger - search for it in the box, as illustrated below:
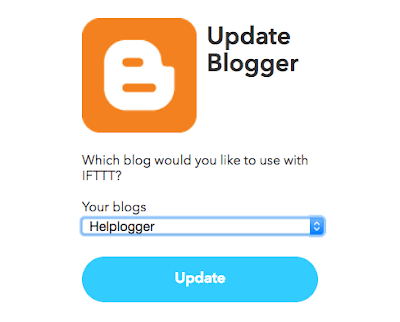
Step 3. Connect Blogger blog with IFTTT
Connect your Blogger account in order to tie it with your IFTTT account. A 'Request for Permission' pop-up will appear > click the 'Allow' button and choose which blog you want to use with IFTTT from the drop-down menu, then click the 'Update' button.After our Blogger blog has been connected, 'Choose a Trigger' that allows you to specify what kind of posts will be published to Facebook. You can choose 'Any new post' or 'New posts labeled'.
Finally, press the blue 'Create Trigger' button to proceed to the next step.
Step 4. Creating the 'That' trigger
After registration, Create a Recipe that will specify the direction with which your blog posting will take. Since you want to link Blogger to Facebook, then the Recipe will be - if Blogger, then Facebook. What you're doing is replacing 'this' to Blogger, which is the source, and 'that' to Facebook, which is the target destination.To set up 'that', click on the blue-colored 'that'. This will bring up a window that contains a list of social media sites. Search for 'Facebook' in the box and select the 'Facebook Pages' option (select the plain 'Facebook' option if you want to post to your personal profile).
Step 5. Connect Facebook page with IFTTT
Connect your Facebook account. Make sure you are logged into your Facebook account, before you connect. Pressing the 'Connect' button will open a pop-up window to allow IFTTT post on your Facebook page, then select your Facebook page.Hit the 'Done' and 'Continue to the next step' buttons and we're almost done...
You will be prompted to 'Choose an Action', where you get to specify if you only want to 'Create a status message', 'Create a link post', or 'Update a photo from URL'. Choose 'Create a link post' as shown below:
Step 6. Choosing the ingredients
Once you choose an action, a 'Complete Action Fields' window will appear with 'Link URL' and 'Message' box. To add an ingredient, click on the 'Message' field and you'll see a test tube icon on the right hand side. If you click it, a drop-down menu will appear which will let you choose a field to include - select 'PostTitle' and click 'Add Ingredient' blue button on the right side.If you are unsure of what each ingredient does, please visit this page.
Step 7. Finish creating the recipe
Finally, click the blue 'Create Action' button and your recipe should look something like this:To complete your recipe, hit the 'Create Recipe' button.
And that's it! This is how IFTTT recipes are created. Next time you publish a Blogger post, it will be automatically shared to Facebook.