In this tutorial, we will see how to add the author's profile picture and name on a Blogger blog just below the post title. Not only that this can give your blog that personal touch but attaching an image to your blog posts in Blogger can help visitors identify, and perhaps have a level of trust with you. Also, this could be a great addition to blogs with multiple authors, since the info for each publisher will be shown below the titles of their respective posts and this way, they will get the proper credit for their work.

Related: How to Add or Invite Multiple Authors in Blogger
Step 2. Click anywhere inside the code area and press the CTRL + F keys to open the search box. Paste the following code inside the search box, then hit Enter to find it:
Step 4. Next, search for this line (you'll find it twice but stop on the second one):
To display the author's pic, add the URL of the author's Blogger profile and the image URL by replacing the text in blue. It is recommended to use an image with a maximum height of 40px and 40px wide. Once done, the photo of the author will appear next to the "posted by" text just below the post title.
Now for those who maintain a blog with more than one author, you will need to add the following code just above <b:if cond='data:top.showAuthor'>
Now, let's go one step further and add the CSS styles.
Step 6. Search using CTRL + F for this tag:
Step 7. Click on the "Save template" button and that's it. You should see now the profile picture and name of the Blogger author below the title of each post.
Related: How to Add or Invite Multiple Authors in Blogger
Adding the Author's Profile Picture / Avatar and Name in Blogger
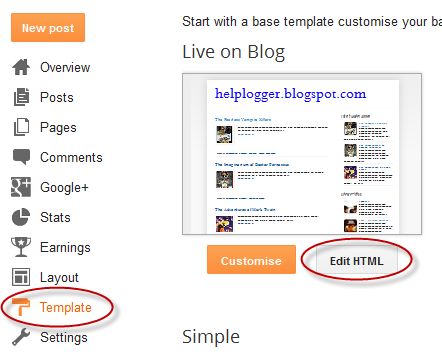
Step 1. From the Blogger Dashboard, go to "Template" and click the "Edit HTML" button.Step 2. Click anywhere inside the code area and press the CTRL + F keys to open the search box. Paste the following code inside the search box, then hit Enter to find it:
<span class='post-author vcard'>Just below this line is the rest of code, which should look something like this:
<span class='post-author vcard'>Note: If you are using a custom template, it could look something like this:
<b:if cond='data:top.showAuthor'>
<b:if cond='data:post.authorProfileUrl'>
<span class='fn' itemprop='author' itemscope='itemscope' itemtype='http://schema.org/Person'>
<meta expr:content='data:post.authorProfileUrl' itemprop='url'/>
<a expr:href='data:post.authorProfileUrl' rel='author' title='author profile'>
<span itemprop='name'><data:post.author/></span>
</a>
</span>
<b:else/>
<span class='fn' itemprop='author' itemscope='itemscope' itemtype='http://schema.org/Person'>
<span itemprop='name'><data:post.author/></span>
</span>
</b:if>
</b:if>
</span>
<span class='post-author vcard'>Step 3. Now that you found the code, delete it. Please note that it should start and end with the tags marked in yellow. This code is repeated two times in the template's code and you will need to remove both occurrences.
<b:if cond='data:top.showAuthor'>
<data:top.authorLabel/>
<span class='fn'><data:post.author/>
</span>
</b:if>
</span>
Step 4. Next, search for this line (you'll find it twice but stop on the second one):
<div class='post-header-line-1'/>Step 5. Just below the line, paste the following code:
<span class='post-author vcard'>Replace the AuthorName text with the EXACT name that appears on the Blogger profile, i.e. the one that appears in the posts or comments. If it is added in a different way, Blogger will not recognize the username, nor the image and the code will not work.
<b:if cond='data:post.author == "AuthorName"'>
<span class='author'><a href='Author-Profile-URL'><img src='Author-Image-URL'/></a></span>
</b:if>
<b:if cond='data:top.showAuthor'>
<data:top.authorLabel/>
<b:if cond='data:post.authorProfileUrl'>
<span class='fn'>
<a expr:href='data:post.authorProfileUrl' itemprop='author' rel='author' title='author profile'>
<data:post.author/>
</a>
</span>
<b:else/>
<span class='fn'><data:post.author/></span>
</b:if>
</b:if>
</span>
To display the author's pic, add the URL of the author's Blogger profile and the image URL by replacing the text in blue. It is recommended to use an image with a maximum height of 40px and 40px wide. Once done, the photo of the author will appear next to the "posted by" text just below the post title.
Now for those who maintain a blog with more than one author, you will need to add the following code just above <b:if cond='data:top.showAuthor'>
<b:if cond='data:post.author == "AuthorName2"'>If you have more than two authors, repeat this block of code for each author that you want to add.
<span class='author'><a href='Author2-Profile-URL'><img src='Author2-Image-URL'/></a></span>
</b:if>
Now, let's go one step further and add the CSS styles.
Step 6. Search using CTRL + F for this tag:
]]></b:skin>Just above the ]]></b:skin> tag, paste the following CSS code:
.post-header {Note: to change the size of avatar, modify the 45px> value.
width: 100%;
padding: 2px 5px;
margin: 5px;
clear: both;
float: left;
}
.author img{
float: left;
margin: 0px 5px 10px 0px;
max-width:100%;
height:45px;
border-radius: 10px;
}
.post-author{
color:#777;
font-size: 13px;
font-style: italic;
}
.post-author a {
color:#777; }
Step 7. Click on the "Save template" button and that's it. You should see now the profile picture and name of the Blogger author below the title of each post.
Thank you for this information! Very valuable.
ReplyDeleteI have one question though. Is it possible to create an author profile of some sort that includes a link to their G+ and a list of all posts authored by them?
Hmm
DeleteThats nice question. But why don't you make this author box automatic. With Google Plus .???
DeleteWhy don't you style the default Author profile below posts ??
Thanks for your great article it really helped me
ReplyDeletenot working ...http://www.informationcamp.net/
ReplyDeleteWhat do you mean "just above it" in the last suggestion in #6? Thanks
ReplyDeleteI have a custom template with an author box, but for some reason it only shows my author bio and not the bios of my contributors. I am still trying to figure out how I can change the code so that it shows the author box for each of my contributors with their info instead of mine. My code is not like the one you have here. It is a little different.
ReplyDeletethehealthymoms.net
how to show custom author profile in custom template?
ReplyDeletei earned good views from your post. thanks
ReplyDeleteHow to do the same in end of the post please help and can u help me please to add Social links of Author bio
ReplyDeleteNice!!! And how to do the same, but on the top of the article? Cheers
ReplyDeleteThank you - helped me fix my blog template!
ReplyDelete