This tutorial will show you how to add another beautiful image slider for Blogger / BlogSpot made with jQuery and, of course, with HTML and CSS. This slider, called Orbit, is a lightweight jQuery plugin that will display multiple images in a limited space using navigation arrows (previous-next buttons). On the upper left of the Orbit slideshow, we have some small bullet icons indicating the current image that we are viewing and, on the upper right side, is the pause option and a timer letting us know when the next image will be displayed.
If you want to see this cool image slider in action, please visit this demo blog:

Related:
Photo Gallery with Thumbnails using Javascript and CSS
Spacegallery: A jQuery Time Machine-like Slideshow/Image Gallery
Image Slider that Displays Pictures on Mouse Hover using only CSS
The HTML markup is pretty clean, just an element that wraps multiple images where the captions are generated from the span tags of these images.
Step 2. Just above </head> add the following scripts:
Note: You can change the transitions speed between each image by modifying the 5000 value from the line in blue - a higher number will make the pictures stay longer between each transition.
Important! If you have already a version of jQuery in your template, please remove the line in red, otherwise the slideshow might not work.
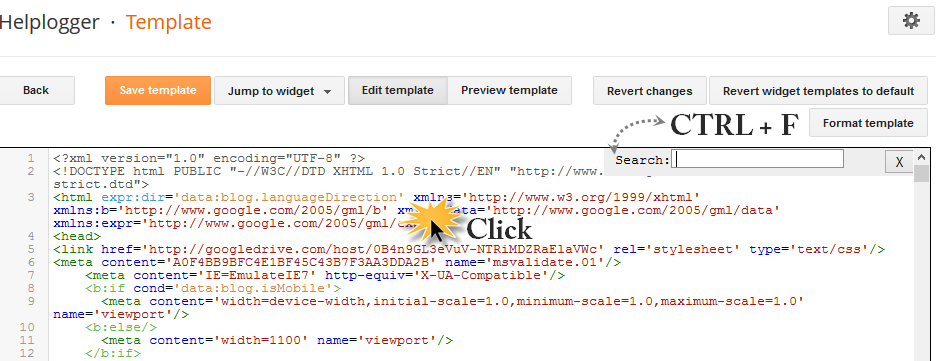
Step 3. Now it is time to add the CSS. Find (CTRL + F) this tag:
Finally, we will use the HTML code that displays the images. We have the option to add the slider either inside one of our posts/pages, or display it as a gadget on the blog' sidebar or below the header.
If you choose to add it inside one of your posts, switch to the HTML tab and paste the code below inside HTML box of your post.
If you want to add it in the blog sidebar/below the header, go to "Layout", click on the "Add a gadget link" > choose "HTML/JavaScript" from the pop-up window and paste this html inside the box:
If you want to add more pictures, add this HTML before the </div> tag:
After you added your images, click the "Save" or "Publish" button and that's it! Now you can enjoy this cool Orbit Image Slider for Blogger.
If you want to see this cool image slider in action, please visit this demo blog:
Related:
Photo Gallery with Thumbnails using Javascript and CSS
Spacegallery: A jQuery Time Machine-like Slideshow/Image Gallery
Image Slider that Displays Pictures on Mouse Hover using only CSS
The HTML markup is pretty clean, just an element that wraps multiple images where the captions are generated from the span tags of these images.
How to Add the Orbit Image Slider to Blogger
Step 1. From your Blogger Dashboard, go to Template > Edit HTML > click anywhere inside the code area and press the CTRL + F keys to open the blogger search box. Paste or type the below tag inside the search box and hit Enter to find it.</head>
Step 2. Just above </head> add the following scripts:
<script src='http://ajax.googleapis.com/ajax/libs/jquery/1.4.2/jquery.min.js' type='text/javascript'/>
<!--[if IE]>
<style type="text/css">
.timer { display: none !important; }
div.caption { background:transparent; filter:progid:DXImageTransform.Microsoft.gradient(startColorstr=#99000000,endColorstr=#99000000);zoom: 1; }
</style>
<![endif]-->
<script type='text/javascript'>
$(window).load(function() {
$('#featured').orbit({
advanceSpeed: 5000,
'bullets': true,
'timer' : true,
'animation' : 'horizontal-slide'
});
});
</script>
<script type='text/javascript'>
//<![CDATA[
/*
* jQuery Orbit Plugin 1.1
* www.ZURB.com/playground
* Copyright 2010, ZURB
* Free to use under the MIT license.
* http://www.opensource.org/licenses/mit-license.php
*/
(function(e){e.fn.orbit=function(a){a=e.extend({animation:"fade",animationSpeed:800,advanceSpeed:4E3,startClockOnMouseOut:true,startClockOnMouseOutAfter:3E3,directionalNav:true,captions:true,captionAnimationSpeed:800,timer:false,bullets:false},a);return this.each(function(){function m(c){function g(){f.eq(h).css({"z-index":1});s=false}var h=b,k=c;if(h==k)return false;if(!s){s=true;if(c=="next"){b++;if(b==n)b=0}else if(c=="prev"){b--;if(b<0)b=n-1}else{b=c;if(h<b)k="next";else if(h>b)k="prev"}a.bullets&&
x();if(a.animation=="fade"){f.eq(h).css({"z-index":2});f.eq(b).css({opacity:0,"z-index":3}).animate({opacity:1},a.animationSpeed,g);a.captions&&o()}if(a.animation=="horizontal-slide"){f.eq(h).css({"z-index":2});k=="next"&&f.eq(b).css({left:t,"z-index":3}).animate({left:0},a.animationSpeed,g);k=="prev"&&f.eq(b).css({left:-t,"z-index":3}).animate({left:0},a.animationSpeed,g);a.captions&&o()}if(a.animation=="vertical-slide"){f.eq(h).css({"z-index":2});k=="prev"&&f.eq(b).css({top:u,"z-index":3}).animate({top:0},
a.animationSpeed,g);k=="next"&&f.eq(b).css({top:-u,"z-index":3}).animate({top:0},a.animationSpeed,g);a.captions&&o()}}}var b=0,n=0,t,u,s,d=e(this).addClass("orbit"),f=d.find("img, a img");f.each(function(){var c=e(this),g=c.width();c=c.height();d.width(g);t=d.width();d.height(c);u=d.height();n++});f.eq(b).css({"z-index":3});if(a.timer){d.append('<div class="timer"><span class="mask"><span class="rotator"></span></span><span class="pause"></span></div>');var j=e("div.timer"),p;if(j.length!=0){var C=
a.advanceSpeed/180,v=e("div.timer span.rotator"),y=e("div.timer span.mask"),z=e("div.timer span.pause"),l=0,A,w=function(){p=true;z.removeClass("active");A=setInterval(function(){var c="rotate("+l+"deg)";l+=2;v.css({"-webkit-transform":c,"-moz-transform":c,"-o-transform":c});if(l>180){v.addClass("move");y.addClass("move")}if(l>360){v.removeClass("move");y.removeClass("move");l=0;m("next")}},C)},q=function(){p=false;clearInterval(A);z.addClass("active")};w();j.click(function(){p?q():w()});if(a.startClockOnMouseOut){var B;
d.mouseleave(function(){B=setTimeout(function(){p||w()},a.startClockOnMouseOutAfter)});d.mouseenter(function(){clearTimeout(B)})}}}if(a.captions){d.append('<div class="caption"><span class="orbit-caption"></span></div>');var r=d.children("div.caption").children("span").addClass("orbit-caption").show(),o=function(){var c=f.eq(b).attr("rel"),g=e("#"+c).html(),h=r.height()+20;r.attr("id","#"+c).html(g);g?r.parent().stop().animate({bottom:0},a.captionAnimationSpeed):r.parent().stop().animate({bottom:-h},
a.captionAnimationSpeed)};o()}if(a.directionalNav){d.append('<div class="slider-nav"><span class="right">Right</span><span class="left">Left</span></div>');j=d.children("div.slider-nav").children("span.left");var D=d.children("div.slider-nav").children("span.right");j.click(function(){a.timer&&q();m("prev")});D.click(function(){a.timer&&q();m("next")})}if(a.bullets){d.append('<ul class="orbit-bullets"></ul>');var E=e("ul.orbit-bullets");for(i=0;i<n;i++){j=e("<li>"+i+"</li>");e("ul.orbit-bullets").append(j);
j.data("index",i);j.click(function(){a.timer&&q();m(e(this).data("index"))})}var x=function(){E.children("li").removeClass("active").eq(b).addClass("active")};x()}})}})(jQuery);
//]]>
</script>
Note: You can change the transitions speed between each image by modifying the 5000 value from the line in blue - a higher number will make the pictures stay longer between each transition.
Important! If you have already a version of jQuery in your template, please remove the line in red, otherwise the slideshow might not work.
Step 3. Now it is time to add the CSS. Find (CTRL + F) this tag:
]]></b:skin>Step 4. Just above ]]></b:skin> add this code:
#featured {height: 1px; width: 1px; overflow: hidden;}Step 5. Click on the "Save template" button to save the changes.
div.orbit {
width: 1px;
height: 1px;
position: relative;
overflow: hidden;
}
div.orbit img {
position: absolute;
top: 0;
left: 0;
}
div.orbit a img {border: none;}
div.timer {
width: 40px;
height: 40px;
overflow: hidden;
position: absolute;
top: 10px;
right:10px;
opacity: .6;
cursor: pointer;
z-index: 1001;
}
span.rotator {
display: block;
width: 40px;
height: 40px;
position: absolute;
top: 0;
left: -20px;
background: url(https://blogger.googleusercontent.com/img/b/R29vZ2xl/AVvXsEhjVhlSm0tJec9UbWaKW-J-RJALUUFvc4Ofj7YPxbiP5C2J6lj53LTBlqETqA8xU-y2AAyfqj7rH_6s0v9DUVcjvWEQ8o9kAcgy5X_juw0g7W6AmDeKPTyfqwBC-hcwtxhDXKY7UkFmZrXQ/s1600/timer-icon.png);
background-repeat: no-repeat;
z-index: 3;
}
span.mask {
display: block;
width: 20px;
height: 40px;
position: absolute;
top: 0;
right: 0;
z-index: 2;
overflow: hidden;
}
span.rotator.move {left: 0;}
span.mask.move {
width: 40px;
left: 0;
background: url(https://blogger.googleusercontent.com/img/b/R29vZ2xl/AVvXsEgZBwV3ppr0gh01pYSATjFGC_u2-Blb3vMlBF0abnJMPTAt4-KranbC1SS1epTB7t1JEq4BJgB3xb1dTOdZ_DTQa5dBX0HDZVGTtyzIEhWMoh0fRqKKB9mVV9nZXXT8K7CQX3MiyVcSje_c/s1600/timer-right.png);
background-repeat: repeat;
background-position: 0px 0px;
}
span.pause {
display: block;
width: 40px;
height: 40px;
position: absolute;
top: 0;
left: 0px;
background-image: url(https://blogger.googleusercontent.com/img/b/R29vZ2xl/AVvXsEii-H7OeccqSMRsxZ268H1WWJGbor2VTwOYSaIALYejf9ZoSDq5qiolUA3HyM98x1HIe1V2t7KJh-fIKZMr6lCKz4Hx9xW_iOb653Kew-2RUv8heekdD09YdFBEoNgIJdGG-IXps5PsNo8X/s1600/pause-icon.png);
background-repeat: no-repeat;
z-index: 4;
opacity: 0;
}
div.timer:hover span.pause,
span.pause.active,
div.timer:hover span.pause.active { opacity: 1; }
div.caption {
background: #000;
background: rgba(0,0,0,.6);
width: 100%;
z-index: 1000;
position: absolute;
bottom:-100px;
color: #fff;
padding: 8px 0;
text-align: center;
}
div.caption span {
padding: 0 10px;
font-size: 14px;
text-shadow: 0px 1px 0px rgba(0,0,0,.8);
margin: 0;
}
.orbit-caption { display: none; }
div.orbit:hover div.slider-nav { display: block; }
div.slider-nav { display: none; }
div.slider-nav span {
width: 33px;
height: 33px;
text-indent: -9999px;
position: absolute;
z-index: 1000;
top: 43%;
cursor: pointer;
}
div.slider-nav span.right {
background-image: url(https://blogger.googleusercontent.com/img/b/R29vZ2xl/AVvXsEjJfgohduUAti9E4xioqm8lKa5Ed_YyMMVJLhMbDwWp2ppHcVZTYcLhnUQglx4T2_F-ukZViJt1aMqL9Z8VHDFjkFzqenCwchkT37dbbCbPUkIwH8HsOzfNaV65LqcoTWEMBVd0sZac92JL/s1600/arrow-right.png);
right: 10px;
}
div.slider-nav span.left {
background-image: url(https://blogger.googleusercontent.com/img/b/R29vZ2xl/AVvXsEhB_VARAZHC5FziHcxwxX88O2H_NFCxwPdVupMGgMZLsTyY_IseOeV3HM-LBCcofNkJ22nqs7UA6EekxuSMn7ohoC7NYLzcnfrI3cL1pkET-tT3w6IsBhk339hyphenhyphennDq5JWoEq13Did5uw15w/s1600/arrow-left.png);
left: 10px;
}
.orbit-bullets {
position: absolute;
z-index: 1000;
list-style: none;
top: 10px;
left: 7px;
margin: 0;
padding: 0;
}
.orbit-bullets li {
float: left;
margin-left: 5px;
cursor: pointer;
color: #999;
text-indent: -9999px;
background-image: url(https://blogger.googleusercontent.com/img/b/R29vZ2xl/AVvXsEiZoJ5bR2Ld3BJ814qiHSenMPJiMPzqBX0LbT4oIW4rvryg8kZEQAl9NRfXWBG8eB5-jG3IK4ltEOi1_K_CuCRHhhpet90z83JUWbYbYHnYW-vJqGOZRM_qo1GtEU-_rW-5j9ZsYDrUS4G6/s1600/bullets.png);
background-repeat: no-repeat;
background-position: 0 0;
width: 7px;
height: 7px;
overflow: hidden;
}
.orbit-bullets li.active { color: #222; background-position: -7px 0; }
Finally, we will use the HTML code that displays the images. We have the option to add the slider either inside one of our posts/pages, or display it as a gadget on the blog' sidebar or below the header.
If you choose to add it inside one of your posts, switch to the HTML tab and paste the code below inside HTML box of your post.
If you want to add it in the blog sidebar/below the header, go to "Layout", click on the "Add a gadget link" > choose "HTML/JavaScript" from the pop-up window and paste this html inside the box:
<div id='featured'>This code contains the images, links and descriptions for each image. In blue, are the URLs of the links and images that you need to replace with your own. Inside the HTML code of each image, you have the size of each picture that can be changed by modifying the width (590) and height (348) values. To add the description for your pictures, replace the text in red.
<a href='Link URL'><img rel='photo1' src="image URL" style='height: 348px; width: 590px;'/></a>
<span class='orbit-caption' id='photo1'>Ut eleifend tortor aliquet, fringilla nunc non, consectetur magna.</span>
<a href="Link URL"><img rel='photo2' src="image URL" style='height: 348px; width: 590px;'/></a>
<span class='orbit-caption' id='photo2'>This is an example of description with links: <a href='Description Link URL' style='color: #09A7EA;'>Helplogger</a></span>
<a href="Link URL"><img rel='photo3' src="image URL" style='height: 348px; width: 590px;'/></a>
<span class='orbit-caption' id='photo3' style='text-align:center;'>Ut eleifend tortor aliquet, fringilla nunc non, consectetur magna.</span>
<a href='Link URL'><img rel='photo4' src="image URL" style='height: 348px; width: 590px;'/></a>
<span class='orbit-caption' id='photo4'>This is an example of description with links: <a href='Description Link URL' style='color: #09A7EA;'>Helplogger</a></span>
</div>
If you want to add more pictures, add this HTML before the </div> tag:
<a href='Link URL'><img rel='photo5' src="image URL" style='height: 348px; width: 590px;'/></a>Notice that each image and description has an unique identifier (id) and shouldn't be repeated. For instance, in the description text of the first image, we have the id="photo1" and within the image code is the "rel" attribute with the name of the id, that is rel="photo1".
<span class='orbit-caption' id='photo5'>Ut eleifend tortor aliquet, fringilla nunc non, consectetur magna.</span>
After you added your images, click the "Save" or "Publish" button and that's it! Now you can enjoy this cool Orbit Image Slider for Blogger.
great sharing brother ! thanks, I'll try it on my blog after :)
ReplyDeleteHow to calls more new post to features slide
ReplyDeleteTried adding your code but its not working properly in my blog
ReplyDeleteThank you brother, this is awesome .
ReplyDeletethanks a lot, this works great!!
ReplyDeleteThanks but how do I change the width of the widget?
ReplyDeleteAlso how can I make it appear only in homepage?
doesn't work
Thanks, it is beautiful and it is working just fine, but I wanted to know how I am able to change its position, for instance center of column; would you please help with that ? that you.
ReplyDeletePlz add full widget blogger Slider
ReplyDeleteits too be how can i re-size it
ReplyDeletethank bro but i cant find ]]> in my html
ReplyDeleteworking thank you sir
ReplyDeleteit's not working in my blog, :((
ReplyDeleteIt's not working on my blog. What should I do? Please I really really need this on my blog.
ReplyDeletePlease make sure that you have only one line of jQuery. You can check this by searching for the 'jquery' keyword in the html code of your template (it should appear within the script tag(s)). If it appears in more than one place, you may need remove the other occurrences. Don't forget to make a backup of your template before changing anything.
DeleteIsn't this feature work on custom blog or else only on blogger hosted sites.
ReplyDeletePlease clarify.
Thank you so much this feature works well.
ReplyDeleteIn order to appear this image slider in homepage itself, where should I put the image links code rather than on "Add a Gadget link".
Please help me.
Thanks in advance.