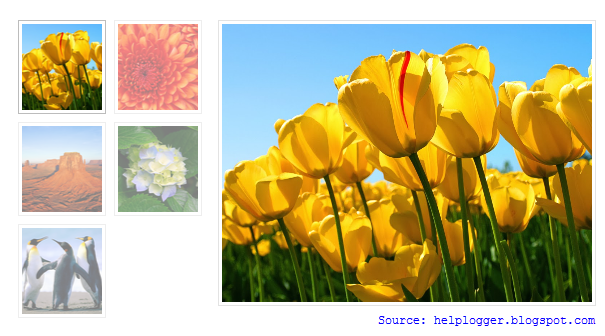
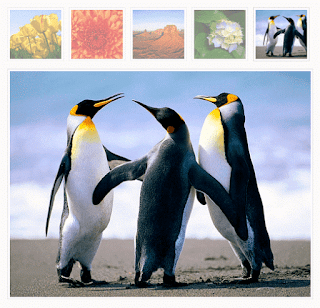
For those who would like to show pictures in an image gallery, here's a beautiful gallery made with JavaScript and CSS. This image gallery displays the available thumbnails either vertically or horizontally on top of the chosen picture, thus making it easier for you to pick different images on mouse click.
With the help of CSS, we can make the <img> element to display on same position with the rest of the thumbs and style the thumbnails as small blocks with a defined height and width. The script will add a click-event for each <li> object that changes it's child's <img> visibility and will assign an "active" class name to the <li>.
Related: Image Slider with Mouse Hover Effect using CSS only
Step 2. Click anywhere inside the code area and press the CTRL + F keys to open the search box:
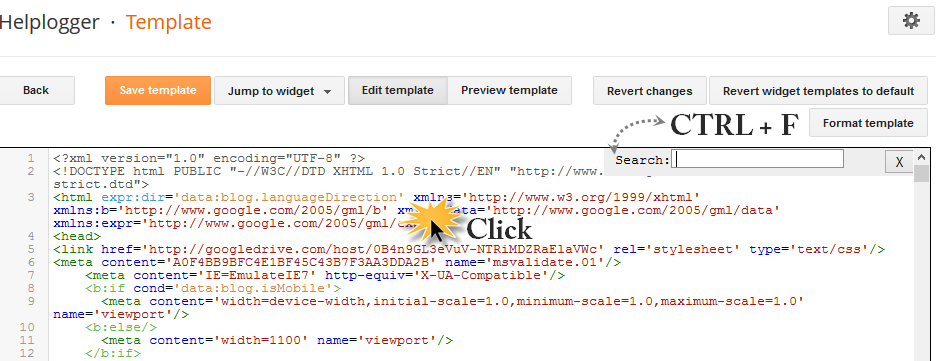
Step 3. Type the following tag inside the search box and hit Enter to find it:
In #jquery-gallery we have the width of the container for the thumbnails (200px), so that they display in two rows and for this we need to calculate the width of the thumbnail (80px) plus the margins between them.
The left declaration of #jquery-gallery li img is to move the larger thumbnail that shows on mouse click so that it doesn't overlap with the smaller thumbnails.
Step 5. Paste the code of the chosen style just above the </head> tag.
Step 6. Now above the same </head> tag, add this script:
Step 7. Finally, save the changes by clicking the "Save template" button.
And here's the HTML code providing a normal list with the image-gallery ID, enclosed within a DIV with a relative position in order to avoid side effects of other pre-existing positions.
Step 8. Paste the below HTML to where you want to display the gallery by going either to "Layout" and adding a new gadget (click on the "Add a gadget" link and choose "HTML/JavaScript" option), or inside a post/page in the HTML section.
Example:
In case you need to make the pictures clickable, add this HTML structure instead:
Update: To add captions, please include the lines in orange and then replace the "Caption" with the text that you want to appear on each picture:
Save the widget or publish your page and you're done adding the thumbnail image / photo gallery in Blogger.
With the help of CSS, we can make the <img> element to display on same position with the rest of the thumbs and style the thumbnails as small blocks with a defined height and width. The script will add a click-event for each <li> object that changes it's child's <img> visibility and will assign an "active" class name to the <li>.
Related: Image Slider with Mouse Hover Effect using CSS only
How to Add Image Gallery with Thumbnails to Blogger
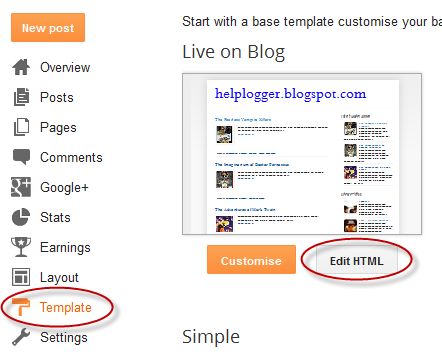
Step 1. Log in to your Blogger account, select your blog and go to "Template", press the "Edit HTML" button.Step 2. Click anywhere inside the code area and press the CTRL + F keys to open the search box:
Step 3. Type the following tag inside the search box and hit Enter to find it:
</head>Step 4. Now pick one of the styles below and copy the code below it:
<style type='text/css'>
#image-gallery {display: none;}
#jquery-gallery {padding:0;margin:0;list-style: none; width: 500px;}
#jquery-gallery li {width:84px; height: 80px;background-size: 100%;-webkit-background-size: cover;-moz-background-size: cover; -o-background-size: cover;background-size: cover;margin-right: 10px; border: 3px solid #fff; outline: 1px solid #E3E3E3; margin-bottom: 10px;opacity: .5; filter:alpha(opacity=50); float: left; display: block; }
#jquery-gallery li img { position: absolute; top: 100px; left: 0px; display: none;}
#jquery-gallery li.active img { display: block; border: 3px solid #fff; outline: 1px solid #E3E3E3; width:490px; max-height: 375px;}
#jquery-gallery li.active, #jquery-gallery li:hover { outline-color: #DFDFDF; opacity: .99;filter:alpha(opacity=99);}
#gallery-caption {background: rgba(0, 0, 0, 0.3);color: #fff;font-size: 16px;font-weight: bold;left: 3px;position: absolute;text-align: center;top: 103px;width: 490px;text-transform: uppercase;}
</style>
<style type='text/css'>Note: The display: none; for the first ID (#image-gallery) is to prevent images appear with their actual size before they go inside the gallery container.
#image-gallery { display: none; }
#jquery-gallery {padding:0;margin:0;list-style: none; width: 200px; }
#jquery-gallery li {background-size: 100%;-webkit-background-size: cover;-moz-background-size: cover; -o-background-size: cover;background-size: cover;margin-right: 10px; width: 80px; height: 80px; border: 3px solid #fff; outline: 1px solid #ddd; margin-right: 10px; margin-bottom: 10px; opacity: .5;filter:alpha(opacity=50); float: left; display: block; }
#jquery-gallery li img { position: absolute; top: 0px; left: 200px; display: none; }
#jquery-gallery li.active img { display: block; width:370px; border: 3px solid #fff; outline: 1px solid #E3E3E3; }
#jquery-gallery li.active, #jquery-gallery li:hover { outline-color: #bbb; opacity: .99;filter:alpha(opacity=99);}
#gallery-caption {background: rgba(0, 0, 0, 0.3);color: #fff;font-size: 16px;font-weight: bold;text-transform: uppercase;margin: 0 -17px;position: absolute;right: 0;text-align: center;top: 3px;width: 370px;}
</style>
In #jquery-gallery we have the width of the container for the thumbnails (200px), so that they display in two rows and for this we need to calculate the width of the thumbnail (80px) plus the margins between them.
The left declaration of #jquery-gallery li img is to move the larger thumbnail that shows on mouse click so that it doesn't overlap with the smaller thumbnails.
Step 5. Paste the code of the chosen style just above the </head> tag.
Step 6. Now above the same </head> tag, add this script:
<script type='text/javascript'>Basically, what this script does is to check if there is any ID named "image-gallery" and get the different list items that may exist within it. These elements will be displayed as thumbnails and a function will decide what to do once they are clicked. So, each time we click on a thumbnail, the "active" class will be assigned and the thumbnail should be visible in the larger container.
//<![CDATA[
var gal = {
init : function() {
if (!document.getElementById || !document.createElement || !document.appendChild) return false;
if (document.getElementById('image-gallery')) document.getElementById('image-gallery').id = 'jquery-gallery';
var li = document.getElementById('jquery-gallery').getElementsByTagName('li');
li[0].className = 'active';
for (i=0; i<li.length; i++) {
li[i].style.backgroundImage = 'url(' + li[i].getElementsByTagName('img')[0].src + ')';
li[i].title = li[i].getElementsByTagName('img')[0].alt;
gal.addEvent(li[i],'click',function() {
var im = document.getElementById('jquery-gallery').getElementsByTagName('li');
for (j=0; j<im.length; j++) {
im[j].className = '';
}
this.className = 'active';
document.getElementById('gallery-caption').innerHTML = this.title;
});
}
},
addEvent : function(obj, type, fn) {
if (obj.addEventListener) {
obj.addEventListener(type, fn, false);
}
else if (obj.attachEvent) {
obj["e"+type+fn] = fn;
obj[type+fn] = function() { obj["e"+type+fn]( window.event ); }
obj.attachEvent("on"+type, obj[type+fn]);
}
}
}
gal.addEvent(window,'load', function() {
gal.init();
});
//]]>
</script>
Step 7. Finally, save the changes by clicking the "Save template" button.
And here's the HTML code providing a normal list with the image-gallery ID, enclosed within a DIV with a relative position in order to avoid side effects of other pre-existing positions.
Step 8. Paste the below HTML to where you want to display the gallery by going either to "Layout" and adding a new gadget (click on the "Add a gadget" link and choose "HTML/JavaScript" option), or inside a post/page in the HTML section.
<div style="position:relative;">Note: if elements on your page overlap with this gallery, you might need to add the height declaration after "position: relative;". The value of height depends on the size of your gallery.
<ul id="image-gallery">
<li><img src="IMAGE-URL1" /></li>
<li><img src="IMAGE-URL2" /></li>
<li><img src="IMAGE-URL3" /></li>
<li><img src="IMAGE-URL4" /></li>
<li><img src="IMAGE-URL5" /></li>
</ul>
</div>
Example:
<div style="position:relative; height: 500px;">Change IMAGE-URL1 with the image URL. If you don't know how to get the address of an image, see this tutorial: How to Upload Images and Get the URL
In case you need to make the pictures clickable, add this HTML structure instead:
<div style="position:relative;">Again, here you need to replace the page-URL text with the URL of your page/post.
<ul id="image-gallery">
<li><a href="page-URL"><img src="IMAGE-URL1" /></a></li>
<li><a href="page-URL"><img src="IMAGE-URL2" /></a></li>
<li><a href="page-URL"><img src="IMAGE-URL3" /></a></li>
<li><a href="page-URL"><img src="IMAGE-URL4" /></a></li>
<li><a href="page-URL"><img src="IMAGE-URL5" /></a></li>
</ul>
</div>
Update: To add captions, please include the lines in orange and then replace the "Caption" with the text that you want to appear on each picture:
<div style="position:relative;">
<ul id="image-gallery">
<li><a href="page-URL"><img alt="Caption" src="IMAGE-URL1" /></a></li>
<li><a href="page-URL"><img alt="Caption" src="IMAGE-URL2" /></a></li>
<li><a href="page-URL"><img alt="Caption" src="IMAGE-URL3" /></a></li>
<li><a href="page-URL"><img alt="Caption" src="IMAGE-URL4" /></a></li>
<li><a href="page-URL"><img alt="Caption" src="IMAGE-URL5" /></a></li>
</ul>
<div id="gallery-caption"></div>
</div>
Save the widget or publish your page and you're done adding the thumbnail image / photo gallery in Blogger.
Hello,
ReplyDeletefirst thank you very much for this tutorial. It is great!
I just wold like to know if it is possible on "Style 1" to have two (or more) rows of the above thumbnails? I tried but the second row is overlaying the main display box thingy. It would be also nice to know, if it is possible to align thumbnails and main box so that they both have the same width.
All the best.
Hi Tobias,
DeleteTo add space for more rows, increase the 100px value from this line:
#jquery-gallery li img { position: absolute; top: 100px; left: 0px; display: none;}
For instance, the mini thumbnails have a height of 80px and a bottom margin of 10px, so in order to make more space for a second row, we need to add a value of 200px (80px + 80px + 10px + 10px and the rest is to leave space between the main box and the mini thumbnails).
As for the second question, I'm not sure to which width are you referring to. In case you want to make the container for the mini thumbnails of the same width with the main box, change the 500px value from this line:
#jquery-gallery {padding:0;margin:0;list-style: none; width: 500px;}
All the best to you, too. Thanks for visiting!
How to make thumbnails on the bottom side?
ReplyDeleteBro Whenever you find time, Create a picture gallery for recent posts, so that you don't have to change the addresses each time you post something new. It Would help a lot, and save a lot of time ( : Save a little time for us as well bro ( :
ReplyDeleteHello there,
ReplyDeleteit´s me again. I would like to get two or more galleries on one page, like here. I tried to copy the code from step 4 and paste it again, with another id name like "image-gallery-2", but it didn´t work ... Could you please tell me how to do that?
All the best from Tobias
Hi Tobias,
DeleteThe problem is that JavaScript doesn't allow more than one ID per page, however it would work when visiting individual posts - rather than reading them from homepage or archive pages. I would recommend you to either shrink the lenght of your posts by adding the Read More function, or use this CSS Image Gallery. Sorry for the late reply!
Thanks for this tutorial! It's great.
ReplyDeleteBy any chance, is it possible to add captions to the images, which would appear once clicked?
Thanks
Hi Tiziana Gauci,
DeleteRight now I've updated my post, please add the lines in orange as well. Sorry for the late reply!
how about putting all images in one row and having to click next arrow to show other images.
ReplyDeleteand lastly how to put a caption on each image/s..
thanks in advance and more power! :salute:
Any response to this query?
DeleteHow to put a caption and show it in every image/s
Thanks
@Anonymous: I've updated my post now, please take a look. You will need to add the lines in orange, as well, and make some slight modifications. I hope this will work for you.
DeleteWonderful feature, will it show now all older pictures this way, too? Is there a way to use only "sometimes" this feature? Thanks
ReplyDeleteIs it possible to use this feature just sometimes?
DeleteWould it convert all the posts, from the past too or only from now on?
Hi Monika,
DeleteAdding the above script and codes will affect only the pictures that you want to show inside the gallery, this trick will not modify any posts or pictures already posted on your blog.
Really nice galery... just one question, im not that good with scripts, so is there a way to ad more pictures? i trued with more than 5 the stock up ok but the get over the displaying picture, i tryed changing the margins but failed badly. Thanks :)
ReplyDeleteOh i figured it out just after posting... sorry :D Still great scipt ! Thanks
ReplyDeleteYou're welcome. Thanks for visting!
DeleteThanks for the tutorial, its pretty much done exactly what I wanted it to do! But I'm having problems getting the images to display when I've inserted the URL into the gadget - Im a complete HTML beginner so even basic mistakes are impossible for me to spot! Ive looked at the link you've put on here but I still cant get it to work - any ideas what I'm doing wrong? Maybe and example of the HTML with the URL added would be helpful for me??
ReplyDeleteHi LH,
DeletePlease make sure that you don't remove the quotes after the src= or href= attributes and after the URL. Also, when adding the code, please check that you added it inside the HTML section of the post editor by clicking on the HTML button. Do you see the code instead of the actual widget or the images are broken?
Hi,
DeleteI've had a bit of script but never an image. I've deleted everything, followed the instructions word for word and re-edited it all hoping that I's missed a tiny bit of script or something but no luck. I've removed all the extra script now and am about ready to give up - it's so frustrating!! Ideally I just want the small thumbnail images rather than thumbnails and a bigger image so I've still got a way to go even if I get over this first hurdle - any advice?!
Ah! I've done it!! Deleted everything again, copy and pasted everything again and followed everything step by step - think I'd been taking the wrong URL from the image - such a silly mistake! Have even managed to find out the bit of code that relates to the larger image and add a few extra frames - thanks sooooo much for the tutorial!!
DeleteThanks for the post. My pictures are coming up blurry. Is there a reason for this?
ReplyDeleteYep even my pictures are blurry. followed all instructions to the letter!!
ReplyDeleteThis may happen when the image size is smaller than the one which has to be shown inside the gallery, since the script will try to enlarge each thumbnail to a width of maximum 500px. Please make sure that you copy the address pointing to the original picture and not the image thumbnail.
DeleteThis comment has been removed by the author.
ReplyDeleteUsing the first example, is there a way to display the big image centered as opposed to all being on the left or right. The image im using are different sizes and it looks weird.
ReplyDeleteHi there,
ReplyDeleteThanks for the tutorial.
I tried Style 1, and everything seems good, except, my highlighted image is horizontally stretched (looks short and fat). Any way to rectify this?
Can we use this in pages?
ReplyDeleteThank you !
ReplyDeleteI really like the look of this.
I have implemented it successfully on my blog.
There's only one problem : the right side of my page (links, welcome, archive, ...) is now UNDER this page instead of on the right side.
The link : http://crochets4u.blogspot.be/p/knuffels.html
In all the other pages of my blog, it is still on the right side
How can I resolve this ?
Thanks,
Joke Decorte
hi,
ReplyDeleteI've asked a question in a comment, but in the meantime it has been resolved.
Thanks for thes tips.
Joke