Do you have jQuery in your site or blog and space to insert 10 lines of code? If the answer is yes, and you want to have an automatic slideshow, this is the simplest code I've seen so far. So, having a succession of images added inside a box with a common general container, would give this result:


Related: Image Slider using only CSS
Once confident that you have the library in your template, let's add the below script as well, which will make the set of images load as a slider:
Use the following HTML structure to show the image slider:
- inside a post/page: create a new post and paste the code inside the HTML box.
So this is all you need. For me, it is quite lightweight and efficient, much more than most libraries that are used nowadays - perhaps, too often.
fadeOut(0): Time for the outgoing image
fadeIn(1000): Time for the next image
('#slider');},4000): Time spent in each image
With gt(x) we select all the divs from the number (x). In this case, 0 is the first, so what this line does is to hide (hide()) all the boxes - except the first, that will be the image visible initially.
setInterval(function(){ [what we will do] }, 4000);
We need to reiterate a few things from time to time and we can accomplish this with setInterval - the delay time between each set.
$('#slider div:first-child').fadeOut(0)
Within each of these intervals, we remove (fadeOut) the first box (div:first-child) with a fade out effect, so that images are out of visibility...
.next('div').fadeIn(1000)
...and make the following box (next) to appear gradually (fadeIn).
.end().appendTo('#slider');
Finally, this will show the first image and will move it to the end (appendTo) of the "list".
end() resets the number of elements that we move forward with next(). Thus, the first child made earlier to disappear, is the one that is sent down the stack, and not the image that is currently visible.
Text 1
Text 2
Text 3
This is a long text 4
In the above example, we limited the size of the container and prevented the overflow of larger images. Finally, we added rounded borders and centered the slider.
As for the images, we will set the width to 100% to make them fill the entire container and the min-height to 300px, to fill up all the available height of the parent box, so that there will be no empty space around them.
The HTML markup for this last example, would look like this:
Related: Image Slider using only CSS
How to add a Simple jQuery Slider to Blogger
Step 1. Adding the JavaScript
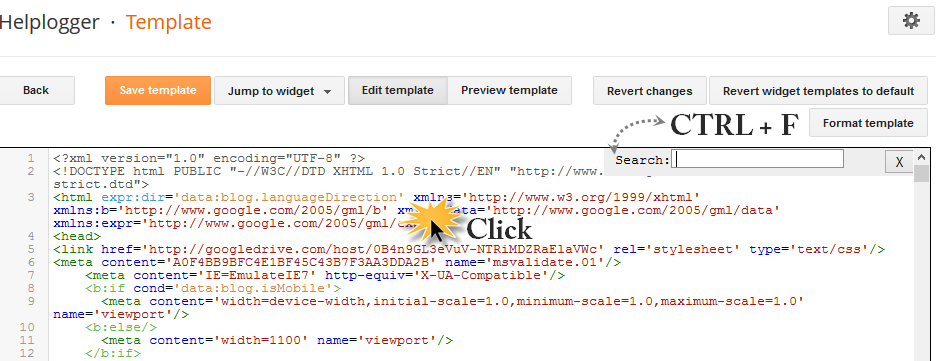
If you don't have jQuery, then you should add this line just above the </head> tag to make the slideshow work:<script src='http://ajax.googleapis.com/ajax/libs/jquery/1.8/jquery.min.js' type='text/javascript'/>Where the </head> tag can be found? Go to Template > Edit HTML > click anywhere inside the code area and press the CTRL + F keys. Inside the search box, type this tag and hit Enter to find it:
</head>
Once confident that you have the library in your template, let's add the below script as well, which will make the set of images load as a slider:
<script type="text/javascript">//<![CDATA[Finally, save the changes by clicking the "Save Template" button. And now, that we finished adding the scripts, let's add the images to where we want to show...
$(function(){
$('#slider div:gt(0)').hide();
setInterval(function(){
$('#slider div:first-child').fadeOut(0)
.next('div').fadeIn(1000)
.end().appendTo('#slider');}, 4000);
});
//]]></script>
2. Create/Add the HTML for the Slider
After implementing the above scripts in the template (although, we could add them directly into a gadget, on a page or even inside the post HTML), we will create the slider like the one above.Use the following HTML structure to show the image slider:
<div id="slider">- as a gadget: go to Layout, click "Add a gadget" and choose the "HTML/JavaScript" option
<div><img src="IMAGE_URL"/></div>
<div><img src="IMAGE_URL"/></div>
<div><img src="IMAGE_URL"/></div>
</div>
- inside a post/page: create a new post and paste the code inside the HTML box.
So this is all you need. For me, it is quite lightweight and efficient, much more than most libraries that are used nowadays - perhaps, too often.
jQuery Slider Settings
The last three numbers of this slider will allow us to adjust some things. All of them are expressed in milliseconds (4000 = 4 seconds):fadeOut(0): Time for the outgoing image
fadeIn(1000): Time for the next image
('#slider');},4000): Time spent in each image
How it Works
$('#slider div:gt(0)').hide();With gt(x) we select all the divs from the number (x). In this case, 0 is the first, so what this line does is to hide (hide()) all the boxes - except the first, that will be the image visible initially.
setInterval(function(){ [what we will do] }, 4000);
We need to reiterate a few things from time to time and we can accomplish this with setInterval - the delay time between each set.
$('#slider div:first-child').fadeOut(0)
Within each of these intervals, we remove (fadeOut) the first box (div:first-child) with a fade out effect, so that images are out of visibility...
.next('div').fadeIn(1000)
...and make the following box (next) to appear gradually (fadeIn).
.end().appendTo('#slider');
Finally, this will show the first image and will move it to the end (appendTo) of the "list".
end() resets the number of elements that we move forward with next(). Thus, the first child made earlier to disappear, is the one that is sent down the stack, and not the image that is currently visible.
3. Customizing the Slider
Even though, we don't need CSS to make the slider work, we can still change its look to display images in different sizes, include captions, or even improve the transition. Here are some ideas:
Text 1
Text 2
Text 3
This is a long text 4In the above example, we limited the size of the container and prevented the overflow of larger images. Finally, we added rounded borders and centered the slider.
#slider {If we would have made the parent box of the images positioned absolutely, they would have overlapped each other. For this reason, we have set the "position" of the container to "relative".
overflow: hidden;
width: 500px;
height: 300px;
border:3px solid #242424;
border-radius: 40px;
margin: 0 auto;
padding: 0;
position: relative;
}
As for the images, we will set the width to 100% to make them fill the entire container and the min-height to 300px, to fill up all the available height of the parent box, so that there will be no empty space around them.
#slider > div {To add more elements like a text or caption, we will enclose the text in span tags and will set the position to "absolute". And to make the text appear at the bottom of the image, we will use the bottom property:
position:absolute;
top:0;
left:0;
}
#slider img {
width:100%;
min-height:300px;
margin:0;
padding:0;
border:0;
}
#slider span {If you want change the look of this slider - go to Template, hit the Customize button and click on the Advanced > Add CSS tab and paste the above CSS codes inside the empty box.
position: absolute;
bottom: 17px;
display: block;
width: 100%;
margin:0;
padding: 15px 0;
color: #fff;
background: #242424;
font-size: 18px;
line-height:18px;
text-align:center;
}
The HTML markup for this last example, would look like this:
<div id="slider">Please note that if you add it inside the post's HTML, don't switch back to the compose tab, as this might remove the span tags of the image captions and the text might not be displayed properly.
<div><a href="Link_URL1"><img src="Image_URL1" /></a><span>TEXT1</span></div>
<div><a href="Link_URL2"><img src="Image_URL2" /></a><span>TEXT2</span></div>
<div><a href="Link_URL3"><img src="Image_URL3" /></a><span>TEXT3</span></div>
</div>
The most wonderful thing about this slider is that it's ridiculously simple! Also, it won't affect much on one's page speed.
ReplyDeleteNice to see HelpLogger coming back with an awesome post. I just wish if you could post more often :)
Great fan!
@techsperia
Thanks a lot bro :)
ReplyDeleteGreat post !
I love this slider. Will add to my blog soon.
ReplyDeleteI am waiting for your new post and now you come back with a gift to us....Thanks Bro!
ReplyDeleteRegards
Bloggingtipsandtrix.blogspot.com
GUd
ReplyDeleteOne of the simple and good slider.
ReplyDeleteRegards,
jeeten.
http://www.surat-training.com/seo_in_surat.php
What a Slider.
ReplyDeleteCan we have this simple silder with navigation? I wanted to implement this in one of my Entertainment blog if you could help me in providing this with navigation.
Probably this was the simplest slider I've googled so far that worked fine. Thanks dude. :)
ReplyDeleteI don't understand where the codes should to be placed.
ReplyDeleteWhat do I have to do if I want to add arrows and bullets to the slider?
ReplyDeleteThank you so much.