Page Peel is a popular page flip effect that when your cursor is passing over it, will show "what's behind" as if it would be a book. There are many ways to do this, many of them use flash files which makes it less customizable, however, the one that we will see in this post is made with jQuery.
Usually, the content that is "behind", is an image for subscribing to feed, but you can put any image and link to any page.
 Demo
Demo
You can see an example in this demo blog.
1. Log in to your Blogger dashsboard, select your blog > then go to Template > Edit HTML
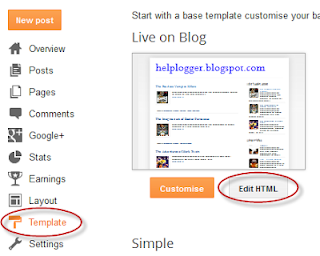
2. Click anywhere inside the code area and search for the below tag by pressing the CTRL + F keys:
- You need to replace the url in red with the address of your blog, that will be the link to the blog's feed when the user clicks on the image behind, but you can put any URL in case you want to link to another page.
6. And that's it. To save the changes, click the Save template button.
Remember that this Page Peel effect uses jQuery, so you should only have one version of it, and if you use Scriptaculous or Mootools, you should apply some changes.
Usually, the content that is "behind", is an image for subscribing to feed, but you can put any image and link to any page.

You can see an example in this demo blog.
How to Add the Page Curl Effect on Blogger
1. Log in to your Blogger dashsboard, select your blog > then go to Template > Edit HTML
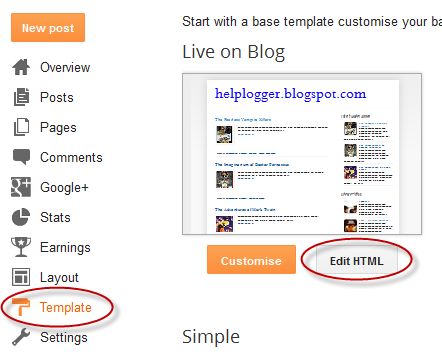
2. Click anywhere inside the code area and search for the below tag by pressing the CTRL + F keys:
</head>3. Just before </head> copy and paste this script:
<script src='http://ajax.googleapis.com/ajax/libs/jquery/1.10.2/jquery.min.js' type='text/javascript'/>4. Then before ]]></b:skin> (CTRL + F to find it - if necessary, click on the left arrow) paste these styles:
<script>
//<![CDATA[
$(document).ready(function(){
$("#pageflip").hover(function() {
$("#pageflip img , .msg_block").stop()
.animate({
width: '307px',
height: '319px'
}, 500);
} , function() {
$("#pageflip img").stop()
.animate({
width: '50px',
height: '52px'
}, 220);
$(".msg_block").stop()
.animate({
width: '50px',
height: '50px'
}, 200);
});
});
//]]>
</script>
/* Page Flip5. Finally, paste after <body> tag or if you can't find it, after this code:
----------------------------------------------- */
#pageflip {
position: relative;
right: 0;
top: 0px; /* Change to 30px if you have the navbar (navigation bar) */
float: right;
z-index:9;
}
#pageflip img {
width: 50px;
height: 52px;
z-index: 99;
position: absolute;
right: 0;
top: 0;
-ms-interpolation-mode: bicubic;
}
#pageflip .msg_block {
width: 50px;
height: 50px;
overflow: hidden;
position: absolute;
right: 0;
top: 0;
background: url(http://oi44.tinypic.com/2hheno6.jpg) no-repeat right top;
}
#pageflipMirror {
position: static;
right: 0;
top: 0;
float: right;
}
<body expr:class='"loading" + data:blog.mobileClass'>The following code:
<div id='pageflip'>- In blue you will see a URL - this is the URL of the image that, in this case, is an invitation to subscribe to the feed. You can change it later to another (should be of the same size).
<a href='http://name-of_your_blog.blogspot.com/atom.xml'>
<img src='http://oi40.tinypic.com/10fqnav.jpg' style='width: 50px; height: 52px; overflow-x: hidden; overflow-y: hidden;'/></a>
<div class='msg_block' style='width: 50px; height: 50px; overflow-x: hidden; overflow-y: hidden; '/>
</div>
- You need to replace the url in red with the address of your blog, that will be the link to the blog's feed when the user clicks on the image behind, but you can put any URL in case you want to link to another page.
6. And that's it. To save the changes, click the Save template button.
Remember that this Page Peel effect uses jQuery, so you should only have one version of it, and if you use Scriptaculous or Mootools, you should apply some changes.
Works like charm! Thanks.
ReplyDeleteThanks man...it really help!
ReplyDeleteThanks for this tutorial. I was looking for this a while. Keep blogging
ReplyDeleteIts really nice Effect
ReplyDelete