The Up and Down buttons can be used to navigate to the top and bottom of the page content, especially when on the main page are many articles or when an article has too many comments. These buttons have a fadeIn and fadeOut effect, this means that they will fade slightly when we are scrolling to the top or bottom of the page and additionally, have the function of going up/down the blog.
 Demo
Demo
You can see a live demo on my blog, the buttons are located on the right side.
How to put Go Up and Go Down buttons using the jQuery slide effect
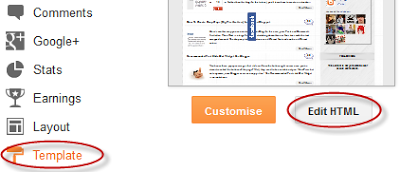
Step 1. Go to Template, click on the Edit HTML button
Step 2. Click anywhere inside the code area and press the CTRL + F keys to open the Blogger search box
Step 3. Copy and paste the following piece of code inside the search box in order to find it:
- You can change the arrows by changing the URLs in blue.
- To change the buttons background color of buttons, change the white text with your color
Step 5. Now search (CTRL + F) for the following tag:
Note: In case you want to remove the "Go to top" button, remove the 1st bolded code and to remove the "Go to bottom" button, remove the 2nd one.
Step 7. Finally, Save your changes by clicking on the Save template button. Enjoy!

You can see a live demo on my blog, the buttons are located on the right side.
How to put Go Up and Go Down buttons using the jQuery slide effect
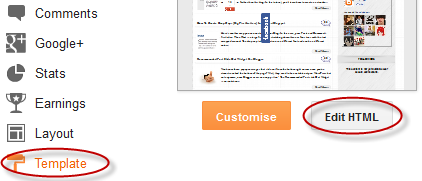
Step 1. Go to Template, click on the Edit HTML button
Step 2. Click anywhere inside the code area and press the CTRL + F keys to open the Blogger search box
Step 3. Copy and paste the following piece of code inside the search box in order to find it:
]]></b:skin>Step 4. Just above ]]></b:skin> paste this one:
/* Up and Down Buttons with jQueryNote: - in green are some annotations that explains what styles you can modify on their left side.
----------------------------------------------- */
.button_up{
padding:7px; /* Distance between the border and the icon */
background-color:white;
border:1px solid #CCC; /* Border Color */
position:fixed;
background: white url(https://blogger.googleusercontent.com/img/b/R29vZ2xl/AVvXsEij4rzh02i9pRw51kc-ia9BEXr9oUmmGyTcYSJtv1TbFzJDLGxAv3XzJQViZQpBiKLYSuNiIUbjFdxy_3-96tKRZvcXi4vPOzsQufbCIs_-YqmlVV0eg0kE7YE7pyiPp1L1z0dFhrYBPzU/s16/arrow_up.png) no-repeat top left;
background-position:50% 50%;
width:20px; /* Button's width */
height:20px; /* Button's height */
bottom:280px; /* Distance from the bottom */
right:5px; /* Change right to left if you want the buttons on the left */
white-space:nowrap;
cursor: pointer;
border-radius: 3px 3px 3px 3px;
opacity:0.7;
filter:progid:DXImageTransform.Microsoft.Alpha(opacity=70);
}
.button_down{
padding:7px; /* Distance between the border and the icon */
background-color:white;
border:1px solid #CCC; /* Border Color */
position:fixed;
background: white url(https://blogger.googleusercontent.com/img/b/R29vZ2xl/AVvXsEhur_W-036xaEw-3t8z90hfNX5lZSZPgAOKegonVMJ9seVSxreXvnrJQPeoDgQ9vU2d36xhn3-nW0NqTZ7Vjlo9U82rN0zAtWJFnidu8VwqsymOMV1hoWiN3rACbXZ_Ar0ETpzPE_NmqTw/s16/arrow_down.png) no-repeat top left;
background-position:50% 50%;
width:20px; /* Button's width */
height:20px; /* Button's height */
bottom:242px; /* Distance from the bottom */
right:5px; /* Change right to left if you want the buttons on the left */
white-space:nowrap;
cursor: pointer;
border-radius: 3px 3px 3px 3px;
opacity:0.7;
filter:progid:DXImageTransform.Microsoft.Alpha(opacity=70);
}
- You can change the arrows by changing the URLs in blue.
- To change the buttons background color of buttons, change the white text with your color
Step 5. Now search (CTRL + F) for the following tag:
</body>Step 6. And just above it, paste the code below:
<script src='http://ajax.googleapis.com/ajax/libs/jquery/1.7.1/jquery.min.js' type='text/javascript'/>
<div class='button_up' id='button_up' style='display:none;'/>
<div class='button_down' id='button_down' style='display:none;'/>
<script>
//<![CDATA[
(function(){var special=jQuery.event.special,uid1='D'+(+new Date()),uid2='D'+(+new Date()+1);special.scrollstart={setup:function(){var timer,handler=function(evt){var _self=this,_args=arguments;if(timer){clearTimeout(timer)}else{evt.type='scrollstart';jQuery.event.handle.apply(_self,_args)}timer=setTimeout(function(){timer=null},special.scrollstop.latency)};jQuery(this).bind('scroll',handler).data(uid1,handler)},teardown:function(){jQuery(this).unbind('scroll',jQuery(this).data(uid1))}};special.scrollstop={latency:300,setup:function(){var timer,handler=function(evt){var _self=this,_args=arguments;if(timer){clearTimeout(timer)}timer=setTimeout(function(){timer=null;evt.type='scrollstop';jQuery.event.handle.apply(_self,_args)},special.scrollstop.latency)};jQuery(this).bind('scroll',handler).data(uid2,handler)},teardown:function(){jQuery(this).unbind('scroll',jQuery(this).data(uid2))}}})();
$(function() {
var $elem = $('body');
$('#button_up').fadeIn('slow');
$('#button_down').fadeIn('slow');
$(window).bind('scrollstart', function(){
$('#button_up,#button_down').stop().animate({'opacity':'0.2'});
});
$(window).bind('scrollstop', function(){
$('#button_up,#button_down').stop().animate({'opacity':'1'});
});
$('#button_down').click(
function (e) {
$('html, body').animate({scrollTop: $elem.height()}, 800);
} );
$('#button_up').click(
function (e) {
$('html, body').animate({scrollTop: '0px'}, 800);
} );});
//]]>
</script>
Note: In case you want to remove the "Go to top" button, remove the 1st bolded code and to remove the "Go to bottom" button, remove the 2nd one.
Step 7. Finally, Save your changes by clicking on the Save template button. Enjoy!
Thanks alot i was searching for this since long for my blog genuinecontent.blogspot.com.
ReplyDeleteAlso can i get just go to top widget,that i can place at the footer of my blog.
Hi vikram,
DeleteTo remove the Go to Bottom button, delete the 2nd bolded code from step 6. To change its position, modify the "bottom" value from step 4 (first code) to 0. I hope this will help!
thanx
ReplyDeleteIt's not working in my site: www.gameguidist.com Please help
ReplyDeleteI wonder adding this will slowdown site loading? Our site is on http://www.smkalfurqan.com/
ReplyDeletejhatu hai be bakwas
ReplyDeletego UP button doesn't appear ::::::::::
ReplyDeleteThanks again; you rock!
ReplyDeleteSee my blog: http://stealthenet.blogspot.in/
ReplyDeleteWhen I add this widget the big slider stops working!
Why?
really help! thanks
ReplyDeleteWow, nice, thanks!
ReplyDeleteThanks!
ReplyDeletethanks
ReplyDeleteAwesome Thanks!!
ReplyDeleteNice... Thanks
ReplyDeleteThanks!! worked really well.
ReplyDeletevisit: www.amazinglysuper.blogspot.com
Nice post, very informative. A great trick to use on blogs. Thanks...
ReplyDeleteNot working in new blogger dashboard just make a new tutorail.
ReplyDeletehttp://techinforu.blogspot.in/
thanks
ReplyDeleteHow do you change the arrow colour? :)
ReplyDeleteNo worries, I figured it was in the instruction all along. Thank you btw. You can see how I made my buttons if you'd like on my blog. :)
ReplyDeleteThanks for this.. will this slowdown the page loading?
ReplyDeleteI'm sorry I can't see any "Expand Widget Templates" box :(
ReplyDeleteThanks brother,
ReplyDeletevery useful,
i have done success in my blog,
thanks very much
very nice button bro......
ReplyDeleteWorks like a charm on my technology blog 'www.techntuts.com' :)
ReplyDeleteThnx a lot bro :)
nice
ReplyDeleteThanks :)
ReplyDeleteGood Yar
Waw... its cool... :)
ReplyDeleteThanks.
ReplyDeleteTHis widget make easy to navigate..
How can I change the distance from the top. I mean, I want the arrow stop at 1/3 of post when it move up? Thanks
ReplyDeletethanks, very helpful.
ReplyDeleteThank you!
ReplyDelete