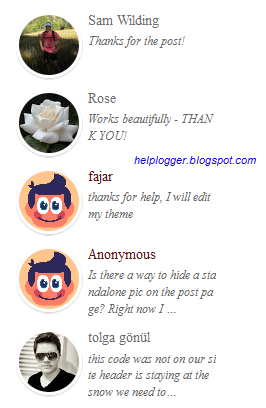
In one of the previous tutorials we shared a simple Recent Comments widget that displays the latest comments published on the blog posts. However, the main downside was that the widget didn't have the option to show the users' avatars. So, for those who'd like to see something more, here's a stylish Recent comments widget with round avatars and comment excerpts. Besides providing the option of displaying the commenters avatars, we'll be able to change the default image for the anonymous avatar as well.
So, let's begin adding this cool recent comments widget in our Blogger blog...

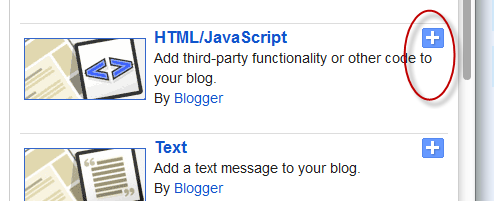
Step 2. When the pop-up window appears, scroll down and choose the 'HTML/JavaScript' gadget:
Step 3. Copy and paste the code for the recent comments widget inside the empty box:
- if you want square avatars instead of round, remove the line in red;
- by default, the recent comments widget with avatars will display 5 comments. If you need to show more, replace the "5" value in red;
- to change the avatar for anonymous users, replace the following address with the URL of your picture:
Step 4. After changing these settings, click the 'Save' button and we're done!
From now on, when a reader sees the recent comments widget with avatars for Blogger in the sidebar, he thinks that your blog is pretty active and that encourages him to post comments on your blog. This way, you can gather some active user base to comment on your blog posts.
So, let's begin adding this cool recent comments widget in our Blogger blog...
How to add recent comments widget with avatars
Step 1. Go to Blogger Dashboard and select your blog > go to 'Layout' and click the 'Add a Gadget' link:Step 2. When the pop-up window appears, scroll down and choose the 'HTML/JavaScript' gadget:
Step 3. Copy and paste the code for the recent comments widget inside the empty box:
<style type="text/css">Note:
ul.helploggercomments{list-style: none;margin: 0;padding: 0;}
.helploggercomments li {background: none !important;margin: 0 0 6px !important;padding: 0 0 6px 0 !important;display: block;clear: both;overflow: hidden;list-style: none;word-break:break-all;}
.helploggercomments li .avatarImage {padding: 3px;
background: #fefefe;-webkit-box-shadow: 0 1px 1px #ccc;-moz-box-shadow: 0 1px 1px #ccc;box-shadow: 0 1px 1px #ccc;float: left;margin: 0 6px 0 0;position: relative;overflow: hidden;}
.avatarRound {-webkit-border-radius: 100px;-moz-border-radius: 100px;border-radius: 100px;}
.helploggercomments li img {padding: 0px;position: relative;overflow: hidden;display: block;}
.helploggercomments li span {margin-top: 4px;color: #666;display: block;font-size: 12px;font-style: italic;line-height: 1.4;}
</style>
<script type="text/javascript">
//<![CDATA[
// Recent Comments Settings
var numComments = 5,
showAvatar = true,
avatarSize = 60,
roundAvatar = true,
characters = 40,
showMorelink = false,
moreLinktext = "More »",
defaultAvatar = "https://blogger.googleusercontent.com/img/b/R29vZ2xl/AVvXsEhAYkLZfbQIUdcF8LvyLAO7Aa0eBTHtz_5tTyli447_k16moNdg1T-H5WjFqj59zQnvRHLRwF4v1K8d6tGbYe2z8Ikttq7BdKHL3AEFxYxTPWkHFQlfyJjMMTqWwqfvy-GF2R1agDUgh0mN/s1600/default-avatar.jpg",
hideCredits = true;
//]]>
</script>
<script type="text/javascript">
eval(function(p,a,c,k,e,r){e=function(c){return(c<a?'':e(parseInt(c/a)))+((c=c%a)>35?String.fromCharCode(c+29):c.toString(36))};if(!''.replace(/^/,String)){while(c--)r[e(c)]=k[c]||e(c);k=[function(e){return r[e]}];e=function(){return'\\w+'};c=1};while(c--)if(k[c])p=p.replace(new RegExp('\\b'+e(c)+'\\b','g'),k[c]);return p}('7 E=E||5,8=8||12,o=o||13,k=k||"h://4.F.p.f/-14/15/16/17/G/18-19.1a",H=H||" 1b &1c;",q=(r q===\'u\')?j:q,v=(r v===\'u\')?Q:v,m=(r m===\'u\')?j:m,I=(r I===\'u\')?Q:m;1d R(w){7 9;9=\'<S J="R">\';K(7 i=0;i<E;i++){7 x,y,3,n;6(i==w.T.b.z)1e;9+="<U>";7 b=w.T.b[i];K(7 l=0;l<b.L.z;l++){6(b.L[l].1f==\'1g\'){x=b.L[l].A}}K(7 a=0;a<b.M.z;a++){y=b.M[a].1h.$t;3=b.M[a].1i$1j.V}6(3.g("/G/")!=-1){3=3.B("/G/","/s"+8+"-c/")}e 6(3.g("/W/")!=-1){3=3.B("/W/","/s"+8+"-c/")}e 6(3.g("/X-c/")!=-1&&3.g("h:")!=0){3="h:"+3.B("/X-c/","/s"+8+"-c/")}e 6(3.g("N.f/C/1k-Y.O")!=-1){3="h://1.F.p.f/-1l/1m/1n/1o/s"+8+"/1p.Z"}e 6(3.g("N.f/C/1q-Y.O")!=-1){3="h://2.F.p.f/-1r/1s/1t/1u/s"+8+"/1v.Z"}e 6(3.g("N.f/C/1w.O")!=-1){6(k.g("1x.f")!=-1){3=k+"&s="+8}e{3=k}}e{3=3}6(q==j){6(m==j){n="1y"}e{n=""}9+="<10 J=\\"1z "+n+"\\"><C J=\\""+n+"\\" V=\\""+3+"\\" 1A=\\""+y+"\\" 1B=\\""+8+"\\" 1C=\\""+8+"\\"/></10>"}9+="<a A=\\""+x+"\\">"+y+"</a>";7 11=b.1D.$t;7 d=11.B(/(<([^>]+)>)/1E,"");6(d!=""&&d.z>o){d=d.1F(0,o);d+="&1G;";6(v==j){d+="<a A=\\""+x+"\\">"+H+"</a>"}}e{d=d}9+="<D>"+d+"</D>";9+="</U>"}9+=\'</S>\';7 P="";6(I==j){P="1H:1I;"}9+="<D 1J=\\"1K-1L:1M;1N:1O;1P-1Q:1R;"+P+"\\">1S 1T<a A=\\"h://w.p.f/\\"> 1U</a></D>";1V.1W(9)}',62,121,'|||authorAvatar|||if|var|avatarSize|commentsHtml||entry||commBody|else|com|indexOf|http||true|defaultAvatar||roundAvatar|avatarClass|characters|blogspot|showAvatar|typeof|||undefined|showMorelink|helplogger|commentlink|authorName|length|href|replace|img|span|numComments|bp|s1600|moreLinktext|hideCredits|class|for|link|author|blogblog|gif|hideCSS|false|helploggercomments|ul|feed|li|src|s220|s512|rounded|png|div|commHTML|60|40|SRSVCXNxbAc|UrbxxXd06YI|AAAAAAAAFl4|332qncR9pD4|default|avatar|jpg|More|raquo|function|break|rel|alternate|name|gd|image|b16|7bkcAKdpGXI|UrbyQRqvSKI|AAAAAAAAFmI|oBv_yMeYnMQ|blogger|openid16|VgnInuIUKBU|UrbzyXTYWRI|AAAAAAAAFmU|3f_Vfj3TI6A|openid|blank|gravatar|avatarRound|avatarImage|alt|width|height|content|ig|substring|hellip|visibility|hidden|style|font|size|10px|display|block|text|align|right|Widget|by|Helplogger|document|write'.split('|'),0,{}))
</script>
<script type="text/javascript" src="/feeds/comments/default?alt=json&callback=helploggercomments&max-results=5"></script><div style="font-size: 10px; float: right; margin-top: -15px">Get this <a href="http://helplogger.blogspot.com/2012/03/add-recent-comments-widget-with-avatar.html">Recent Comments Widget</a></div>
- if you want square avatars instead of round, remove the line in red;
- by default, the recent comments widget with avatars will display 5 comments. If you need to show more, replace the "5" value in red;
- to change the avatar for anonymous users, replace the following address with the URL of your picture:
https://blogger.googleusercontent.com/img/b/R29vZ2xl/AVvXsEhAYkLZfbQIUdcF8LvyLAO7Aa0eBTHtz_5tTyli447_k16moNdg1T-H5WjFqj59zQnvRHLRwF4v1K8d6tGbYe2z8Ikttq7BdKHL3AEFxYxTPWkHFQlfyJjMMTqWwqfvy-GF2R1agDUgh0mN/s1600/default-avatar.jpg- to change the size of the avatar, replace 60 value in green
Step 4. After changing these settings, click the 'Save' button and we're done!
From now on, when a reader sees the recent comments widget with avatars for Blogger in the sidebar, he thinks that your blog is pretty active and that encourages him to post comments on your blog. This way, you can gather some active user base to comment on your blog posts.
Doesn't work on my blog :(
ReplyDeleteNVM I feel stupid, I use disqus comment, do you know how to set it up for disqus. Thanks :)
DeleteHi John,
DeleteYou can get Disqus Recent Comments Widget by logging into your Disqus account, then go to Tools tab and from there you can copy the code for your widget.
Awesome Work I Like It
ReplyDeletegot it! it works. thanks helpblogger!
ReplyDeleteGreat! It works perfectly on my blog. :)
ReplyDeleteThank you...
nice hack
ReplyDeletei can't seem to get thsi to work..
ReplyDeleteyour other one works ..
Super, Thank You!
ReplyDeleteit's work but why admin also in the widget ??
ReplyDeleteBerkunjung sob,ditunggu
ReplyDeletekunjungan baliknya
Not working
ReplyDeleteIt's a great help. Thanks U dude ...
ReplyDeleteits works.. thanks! -from Malaysia
ReplyDeletewow!!! amazing. thanks ya
ReplyDeleteKöszönöm!!:)
ReplyDeleteDesign? Page elements?
ReplyDeleteI see these menu items nowhere on the menu.
And when I change the favicon in "layout" (on lefthand side of page) it has no effect. I cannot replace my old icon.
this is usefull to me
ReplyDeleteI used and change to avatar..change no of comment..but can't work
ReplyDeleteWhy the avatar didnt comuout....
ReplyDeletethanks sir its work nice widget
ReplyDeleteOMG OMG OMG thanks you so much this box looks really good on my blog <33 thanks !!! :D
ReplyDeleteNice...that's working......Wohh..
ReplyDeletehow to exclude the blog author comment?
ReplyDeleteTry these widgets from here
DeleteHow do you get this type of commenting system? like the one with the pictures etc
ReplyDeleteHow can you make cooler anoymous pictures? On my site it just shows that thing with no picture
ReplyDeleteIts work nice widget.I appreciate your post.Thanks so much and let keep on sharing your stuffs.
ReplyDeletenot working for me... idont see the output after i copied and changed the details as written. :(
ReplyDeleteThanks for your code, my blog now http://facebooktopic.blogspot.com/ is more interactive and beautiful. Thanks you so much and keep the good work in helping newcomers in blogging world.
ReplyDeleteThis is fabulous! Thank you for posting this tutorial. (:
ReplyDeleteIs working and is fabulous!! Thank you so, so much!!!!
ReplyDeleteNice...
ReplyDeleteIt works on my blog...
thanks
cool... works well on my blog
ReplyDeletehttp://blog3kaki.blogspot.com/
ReplyDeleteThanks for the great article..
Thanks for sharing.
ReplyDeleteit works my friend... thank you so much, from Philippines..
ReplyDeleteavatar-image-container
ReplyDeleteA very useful article! Thanks.
ReplyDeleteThank you, it works on my blog. I use standard theme instead of Dynamics.
ReplyDeleteDoesn't work
ReplyDeleteThanks for yout tips, it's cute! It works on my blog but it's not the most recent comment, any idea why?
ReplyDeleteI have tried but still can't appears,,, maybe some problem on my template.
ReplyDeleteVisit back on my blog please,,, to every one :)
http://juragancipir.blogspot.com
thx
It work! Thanks!!
ReplyDeleteThanks for sharing... :D
ReplyDeleteLove it! Thanks!
ReplyDeleteI've just add this code above and it works correctly..
ReplyDeleteThank you for sharing
A million thanks!
ReplyDeleteCool, thank you :)
ReplyDeletehttp://ayungavis.blogspot.com
great tip !! keep the good work !
ReplyDeleteWorks beautifully - THANK YOU!
ReplyDeleteworks perfect.
ReplyDelete.thanks.
It may be that I am unfamiliar with C&P codes, but I tried to use the first tutorial and after I (Did change with original blog address) Saved and went and checked it was wrong. What I saw after clicking "Recent Comments" was a link to the tutorial. I think maybe I used to much of the code. I would like to use the code here with the Rose, but I think I need it to be broken down to what I should exactly Copy & Paste. I would appreciate any help. Thank you! May you have a Blessed 2014.
ReplyDeleteThanks for tips:)
ReplyDeletetq bro, it's awesome. have it attached in my blog
ReplyDeleteThis is really awesome! My old widget was broken and I used your advice. Works perfectly, thank you so much! Andreas
ReplyDeleteThanks, Its working on my blog
ReplyDeleteWorks fine in my blog except for the round part, which puzzles me.
ReplyDeleteHi Lyrans,
DeleteYou have the option to remove the roundness of the avatars, just delete the line in red from above (I've updated my post). Thanks for visiting!
Many thanks for this great widget which works well.
ReplyDeleteHowever I have changed to google+ comments system on my blog http://lastingrose.blogspot.co.uk
Is there an rss feed for these comments or a way to extract and show in the widget?
Thanks so killer! Thank you!!
ReplyDeleteIt worked perfectly -- I love the round icons and the choice of replacing the boring anonymous icon with my own image..thank you so much!!
ReplyDeletei like this blog,so owesome....!!!
ReplyDeletewow, very easy to do,,
ReplyDeleteThanks
It looks like I can't customize this widget. I actually changed the number of comments to 6 and set the number of shown characters to 110, but it definitely doesn't show these changes.
ReplyDeleteAlso it doesn't show the default avatar I set, even though it leads precisely to the link of the image I want to have as the default avatar for the widget.
Deletecool .. it work ^^
ReplyDeleteHi,
ReplyDeleteIt doesn't work for me, after the modifications, I juste can read the following information on my blog :
"get this recent comments widget".
By the way, thank you for this great tutorial, I hope I'll find a widget.
Greetings from France.
thanks... very cute ^_^
ReplyDeleteI really like this widget, but it is not working on my blogspot, either. If I don't replace helplogger with my blog name (wingsofprophecy), I get YOUR comments - lol, but if I replace it in the html code (several places - which may be what I'm doing wrong), then nothing displays at all, except my caption, Most Recent Comments. Can you please tell me what I am doing wrong? My blog gets a mil or so hits a year, and this would be really helpful. I originally came to your page looking for a way to make most recent comments appear first on one of my pages and found this.
ReplyDeleteHi Glynda,
DeletePlease add the code again, you don't have to replace any address. I hope it works now!
Please make one for Disqus too...
ReplyDelete