Here's another way to customize your Blog. In this case, your Posts and Comment's first letter. The effect is a large first letter stretching down three or four lines with the text wrapped around. The drop cap letter can also use a different font and have a different color from the rest of the text. This style can be often seen in newspapers, literature, magazines. So, in this tutorial I will show you how to apply automatically a Magazine text style on Blogger Posts and Comments. Let's start adding it...

-> Add Drop Caps For Blogger Posts

drop caps, blogger blogspot, tutorials

-> Add Drop Caps For Blogger Comments

drop caps, first letter, blogger

Big First Letter for your Blogger / Blogspot Posts


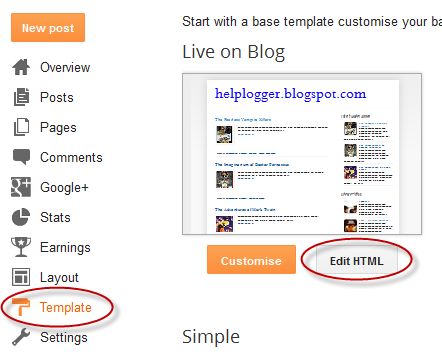
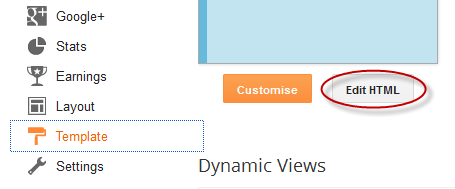
Step 1. From your Blogger Dashboard, go to Template and click on the Edit HTML button:


Step 2. Click anywhere inside the code area and press the CTRL + F keys to open the Blogger' search box. Type this piece of code inside the search box then hit Enter to find it:
]]></b:skin>
Note: you might need to click on the arrow next to it to expand the code within and then you need to search ]]></b:skin> one more time.

Step 3. Just above ]]></b:skin>, add the following CSS code:
.capital:first-letter {
float: left;
display: block;
font-family: Times, serif, Georgia;
font-size: 40px;
color: #000000;
margin:0px 5px 0 0;
padding:0 0 0 10px;
}
Color - change the value in blue with the hex of your color
Size - to change the letter size, increase/decrease the value highlighted in pink.

Step 4. Now search for this code:
<data:post.body/>
Step 5. Then immediately before and after add the red fragments you see in the example below:
 <div class='capital'><data:post.body/></div>
Step 6. Save the changes by clicking on the Save template button.

Important! If the above code is not working, add one of following codes from this example:
<p class="capital"><data:post.body/></p>
Or try this instead:
<span class="capital"><data:post.body/></span>

Big First Letter For Blogger/Blogspot Comments

Step 1. Log in to your Blogger account > go to Template > Edit HTML > click anywhere inside the code area and press CTRL + F keys to open the search box

Step 2. Type the following piece of code inside the search box and hit Enter to find it (if you have already added this code, skip step 2 & 3):
]]></b:skin>
Step 3. Add the following code just above ]]></b:skin>:
.capital:first-letter {
float: left;
display: block;
font-family: Times, serif, Georgia;
font-size: 40px;
color: #000000;
margin:0px 5px 0 0;
padding:0 0 0 10px;
}
Color - to change the letter color, replace the value in blue with the value of your color. Here's a tool that might help you to find the hex of the color that you need: Color Code Generator
Size - to change the letter size, change the value in pink.

Step 4. Then Search for this piece of code:
<data:comment.body/>
Step 5. Add the red codes before and after <data:comment.body/> as you can see in my example below:
<p class="capital"><data:comment.body/></p>
Step 6. Save your Template.

That's it! Now you have a cool drop cap first letter on your blog. If you have any question, leave a comment below!
In a previous tutorial you've seen how you can add numbered comments to your blogger blog, unfortunately, this trick worked only for those who don't have the reply option and are still using the old blogger commenting system. But we won't have any problem this time because this tutorial will show you how to add numbered comments with comment bubbles on the threaded comments, as well ;)

What the following CSS trick will do for you:
  1. When the general block of comments is initiating (.comments-content) a counter called countcomments activates and starts with an initial value of 1. 
  2. Then, each time the code flow goes through a review of any level, either the original comment or a reply (.comment-thread li), it will bring us in front (:before) of the comment's body the number that is the counter.
  3. Finally, this is incremented in the counter (counter-increment).
See the screenshot:
count comments, comment bubble, forum, blogger

Isn't that great? I'm pretty sure many of you have been waiting for this cool trick. So, let's begin applying it for our threaded commenting system.

Steps to add bubble comments count

Step 1: From your Blogger Dashboard, go to Template and click on the Edit HTML button:

... click anywhere inside the code area and press CTRL + F to open the Blogger' search box.

Step 2: Type the following tag inside the search box and hit Enter to find it:
]]></b:skin>
Note. you have to click on the arrow next to it, then search the ]]></b:skin> one more time 

Step 3: Add the following code just above ]]></b:skin>:
.comment-thread ol {
counter-reset: countcomments;
}
.comment-thread li:before {
content: counter(countcomments,decimal);
counter-increment: countcomments;
float: right;
z-index: 2;
position:relative;
font-size: 22px;
color: #555555;
padding-left:10px; 
padding-top:3px; 
background: url(
https://blogger.googleusercontent.com/img/b/R29vZ2xl/AVvXsEjQab8JW-1rOwd47_z5OgkyFopTYkT9YzaLw3DYkagUughfKCgwY98IGWI2UykQCEXt_NPCgoZjEJltp0CfxkW8j-pmSMtcX3KcefCjQbX0Va6WwM4ndjSmBmVMwl-e2NrCoxolVV5LE51s/s1600/comment+bubble2.png) no-repeat;
margin-top:7px; 
margin-left:10px; 
width: 50px; /*image-width size*/
height: 48px; /*image-height size*/ 

}
.comment-thread ol ol {
counter-reset: contrebasse;
}
.comment-thread li li:before {
content: counter(countcomments,decimal) "." counter(contrebasse,lower-latin);
counter-increment: contrebasse;
float: right;
font-size: 18px;
color: #666666;
}
Note:
  • if you want to have no bubble icon, remove the code in red (including the address in blue)
  • to change the comment bubble, replace the code in blue with the URL address of your own icon. If you're not sure what icon you should use, you can find some cool icons in my previous posts (see these tutorials here and here)
  • to change the position of comments count, increase/decrease the values (3 & 10) from padding-top and padding-left
  • to change the position of comments bubble/icon, change the values (10 & 7) from margin-left and margin-top
Step 4: Now Save the Template and you're done!

If you enjoy reading this blog, please share and subscribe. For any questions you may have, leave a comment below.
email subscription form, blogger blogspot, gadgets
When you are providing useful information in your blog, then many times some readers will need to get the latest updates from your blog. For that purpose, you need an Email Subscription Form in your blog, so that the interested visitors can easily get the latest updates.

Related: How to Burn Blogger RSS Feeds at Feedburner

To add email or Feed Subscription Form to your blogger blog (blogspot) is very easy.
Just follow the next steps:

1. Log in to Blogger, then go to Layout > click on "Add a Gadget" link:


 2. From the pop-up window, scroll down and click on the "HTML/JavaScript" gadget:


 3. Paste the following code inside the empty box:
<style>
.hl-email{
background:url(https://blogger.googleusercontent.com/img/b/R29vZ2xl/AVvXsEgaPuL47Ed8uggNqBUVOEmD35HaKQNiicYD-Ohzf6QrZL09hGWocCoVJlrAUbPLHX5BpQh0vp642OtO3u9QvRkzgrem7yczZI2IZALQZQ3e3zOzsmwh-DPFradTHS_Wnrnscwsw_KB9zX0/s1600/mail.png) no-repeat 0px 12px ;
width:300px;
padding:10px 0 0 55px;
float:left;
font-size:1.4em;
font-weight:bold;
margin:0 0 10px 0;
color:#686B6C;
}
.hl-emailsubmit{
background:#9B9895;
cursor:pointer;
color:#fff;
border:none;
padding:3px;
text-shadow:0 -1px 1px rgba(0,0,0,0.25);
-moz-border-radius:6px;
-webkit-border-radius:6px;
border-radius:6px;
font:12px sans-serif;
}
.hl-emailsubmit:hover{
background:#E98313;
}
.textarea{
padding:2px;
margin:6px 2px 6px 2px;
background:#f9f9f9;
border:1px solid #ccc;
resize:none;
box-shadow:inset 1px 1px 1px rgba(0,0,0,0.1);
-moz-box-shadow:inset 1px 1px 1px rgba(0,0,0,0.1);
-webkit-box-shadow:inset 1px 1px 1px rgba(0,0,0,0.1); font-size:13px;
width:130px;
color:#666;}
</style>
<div class="hl-email">
Subscribe via Email <form action="http://feedburner.google.com/fb/a/mailverify" id="feedform" method="post" target="popupwindow" onsubmit="window.open('http://feedburner.google.com/fb/a/mailverify?uri=helplogger', 'popupwindow', 'scrollbars=yes,width=550,height=520');return true">
<input gtbfieldid="3" class="textarea" name="email" onblur="if (this.value == &quot;&quot;) {this.value = &quot;Enter email address here&quot;;}" onfocus="if (this.value == &quot;Enter email address here&quot;) {this.value = &quot;&quot;;}" value="Enter email address here" type="text" />
<input type="hidden" value="helplogger" name="uri"/><input type="hidden" name="loc" value="en_US"/>
<input class="hl-emailsubmit" value="Submit" type="submit" />
</form>
</div>

Settings 
- Replace the url address in green to change the email icon
- To change the width or the text area, increase/decrease the 130px value in red
- replace http://feedburner.google.com/fb/a/mailverify?uri=helplogger with your Feedburner Email Feed link. You can get it by visiting your feedburner account then navigate to "Publicize" and then to "Email Subscriptions".
- Replace helplogger with your feed title. It appears at the end of your feed link. In my case it is http://feedburner.google.com/fb/a/mailverify?uri=helplogger

4. Now Save your widget and check your blog. Enjoy!