The qualities of a blogger should be attended at all times in order to become someone popular on the internet. A blogger should have plenty of ideas for creative writing, along with a truckload of motivation. The results sought will not come overnight and there's no guarantee that this will be easy.

These are the two things that you need in order to fulfill your dream of running a successful blog: a lot of exclusive content and readers' loyalty. In each case, time is required to develop the success. This is a process and not a short-term event.
qualities of a blogger

Related: How to Write SEO Optimized Blog Posts

Top Qualities To Become a Successful Blogger

Here are three qualities of a blogger who as a site administrator will need to have, if your goal is to manage a successful blog.

Patience

A successful blog is a product of time and effort and for this, you will need patience. As I said before, the results will not appear quickly overnight, so it is important to realize this from the start. If you are constantly trying to develop new and creative ideas for writing on your blog and, at the same time, you are worried whether you will see any results, this will only make things more difficult.

The building of a successful business online is a "long term" effort and you must decide if you accept this challenge or not. This is one the most important qualities of a blogger.

Credibility

Much of the traffic of any successful blog results from its unique content, as well as its credibility. In fact, the quality of what's in the site, will have a direct impact on what will become viral visitors that are coming to your platform. If you will provide quality content, people will talk about your blog, and once they do it, others may come to see what you have. It depends on you to publish useful and accurate information and your readers will do the rest.

Consistency

Maintaining a steady stream of creative writing ideas is vital to be able to constantly update the blog. The frequency of publication to a proper schedule is related to the amount of time you have available and your level of motivation. However, it is recommended to establish a sort of consistency, so that people can schedule their own visits accordingly. Just remember that the more often you write, the more people will visit, so their loyalty will grow faster and their referrals will be extended.

To become a popular blogger, it is important to have a healthy source of creative writing ideas, along with a lot of patience and motivation. Ultimately, it will be up to you, as a site administrator, to provide the three qualities of a blogger that we discussed above, who is searching tirelessly his goal of having a successful blog. In the end, your own motivation and patience will be the glue with which all the elements will be put together so that your dream will come true.
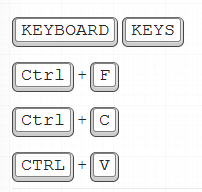
For many of us the design and the template are the most important, making our readers be more interested and coming back to our blog. There's an HTML element meant for marking up keyboard keys named <kbd> which can be styled with CSS, so why not use it to make those elements look the keyboard keys?

Thus, in this tutorial, I am going to show you how to create a keyboard keys effect with CSS. It doesn't require images so your blog will load faster.

how to add keyboard keys with css in blogger

How to Add Keyboard Keys to Blogger


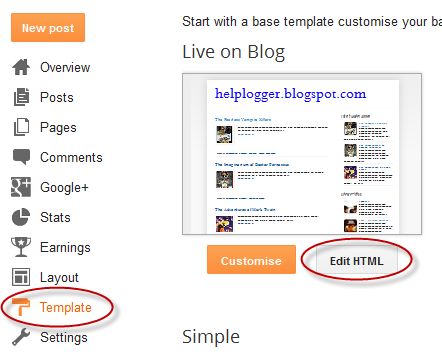
Step 1. From Blogger Dashboard, select your blog and go to Template > Edit HTML

edit the html of blogger template

Step 2. Click anywhere inside the code area, press the Ctrl + F keys and search for this piece of code:
]]></b:skin>
Screenshot
Click on the arrow to expand the code

Step 3: Just above ]]></b:skin> paste this CSS style:
kbd{
border:1px solid gray;
font-size:1.2em;
box-shadow:1px 0 1px 0 #eee, 0 2px 0 2px #ccc, 0 2px 0 3px #444;
-webkit-border-radius:3px;
-moz-border-radius:3px;
border-radius:3px;
margin:2px 3px;
padding:1px 5px;
}
Step 4. To save the changes, press the Save change button.

Finally, we need to add the html <kbd> tags to the text on which we want to apply the keyboard keys style.
From your blogger's dashboard, go to create a New Post, write the text on which you want to apply the style and go to the HTML tab. Before and after the text, add the following HTML tags:
<kbd>Ctrl</kbd> + <kbd>F</kbd>

Screenshot
text with keyboard key effect

This will make it to look like this:

Ctrl + F
Although many insist that blogs hosted on free servers, such as Blogger, are not ideal for getting your blog well-ranked, the truth is that a blog hosted by Blogger can be really fast and well positioned on the Internet if you are using the right SEO tools.

Now, given the latest updates from Google, the best would be hiring a specialized person. However, if you don't have the resources or you want to learn doing this job alone, you can choose to begin with the natural SEO.

Here are some tips to do natural SEO (Search Engine Optimization).

blogger seo

Natural SEO Techniques for Blogger

Pick a Good Domain

We must try having our keyword included in the domain name, and even if this may sacrifice our branding, we can use the redirection.

Create Value Added Content

Not only rewrite articles, or write like they would be intended for us. When writing our posts, we should consider our target audience, i.e., giving advices, tips, suggestions or guidance on specific topics and aside, use links, anchor text and key phrases.

The topic of the links is important

They should be of quality and while, it's no longer required to place five or ten links within the text of your website, now what truly matters, is to make the link relevant to the context.

Finally, the domain, in value-added content and a right use of the internal and external links, will prove to be useless if we don't try to update our blog constantly.

How often should you update your blog?

You don't have to do this on daily basis, even if this may be ideal as, this way, we could achieve a greater relevance in search engines. But don't forget about your blog either. Let's say, two or three times a week would be enough. What should not happen is updating only three times a week and doing nothing next week.

Keep in mind that search engines happen to pass daily on our blog in order to index our content.

I hope that you find these SEO tips useful and if you would like to receive more tutorials by email, subscribe for free to this blog, check out the facebook page or add the RSS feed.
If you are using the Nabble forum on your blog, you will most likely need this gadget as well in order to display the latest topics that have been published on the forum. This works similar to the recent comments gadget as it uses the Blogger blog's feed.

nabble forum
To add the Recent Forum Topics widget to Blogger, follow the steps below:

Adding Recent Forum Topics Widget

Go to your forum and look at the bottom where it says Feeds. Clicking on that link, you will see two Feed links: the first being the Topics only Feed, and the other one is Topics and replies. Pick the one you need.
using nabble feeds to see latest forum topics

Now, log into your Blogger Dashboard, go to "Layout" and look for the Sidebar section on the right side.

Click on the "Add a Gadget" link and choose Feed from the gadgets list. Paste the Feed URL that you copied inside the text box.

configure gadget feed in blogger

Click the "Continue" button to configure the parameters and finally, click "Save changes" to see the results.

That's it... now you should be able to see the Recent Forum Topics widget on your Blogger blog. Enjoy!
Forum is a platform where visitors can interact with each other and discuss different hot topics. There you can create various topics for getting comments or suggestions on them. If you have good traffic, then you can post questions on daily basis for the potential visitors to answer, thus your forum simultaneously converts itself into a huge frequently asked questions section (FAQ).

Forums are a great way to provide your visitors an open social atmosphere to express their useful ideas and share others ideas as well. So, here are a few easy steps on how to add a forum to your Blogger or blogspot blog using Nabble:

blogger forum, blogspot nabble forum

How to Create a Forum on Blogger With Nabble

To add a forum we will use Nabble which is, in my opinion, one of the best free options available online. First, go to the Nabble page to create an account (keep in mind that this account will be the moderator of the forum).

Once we have everything set, go to "Options" -> "Application" -> "Change appearance":

nabble change appearance

There, we can also edit the CSS of the forum, among many other things.

Next, create the structure of a real forum so that it is organized by categories. To do this, click on the "Options" menu - select "Application", then click "Change application type":

nabble option change application type

Then, choose the Forum category and save your changes.

To finish, we only have to create categories. So go back to "Options", this time select "Structure" and then choose "Create a new sub-forum":
nabble create new sub-forum

Fill in the details of the category, and that's it! You will now have your forum up and running.

The rest are small details, like sort categories (Options > Structure > Manage sub-forums), customize your avatar and your signature (YourNickname > Account Settings), change permissions (Options > Users > Permissions), etc.

For adding the newly created forum to your blog, you must go to "Options" - "Embedding options" and copy the javascript code.
nabble forum embedding options

Embed the forum in a Blogger page

Log into your Blogger Dashboard - select your blog, click the "Pages" link on the left sidebar and click to create a "New Page".

Once the page editor has opened, switch to the "HTML" tab next to the "Compose" tab.


Inside the empty box, paste the code that you copied earlier, and if everything went well, you should see the new forum on your Blogger blog.

create a forum for blogger with nabble

So this is how you can add a Forum on a Blogger blog using Nabble. Hope this tutorial has been useful and you will begin using this great service.
The commentators are a fundamental part of any blog, since they are the ones that give life to the blog, opening and replying to discussions which leads to more activity in the posts.
how to add top commenters widget to blogger

It is therefore very important to know which are the most active users of your blog, the users who leave more comments, and for this reason, today I present a great method to display a list with the top commentators.

The gadget will look something like this:

add top commentators widget to blogger

This Top Commentators gadget comes with user's avatar and is done with JavaScript.

How to Add the Top Commenters Gadget to Blogger


1. To add this gadget, you have to go to Layout, click on Add a Gadget link.

2. Select the HTML/JavaScript gadget and copy/paste within the empty box the following code:
<style type="text/css">
.top-commentators {
margin: 3px 0;
border-bottom: 1px dotted #ccc;
}
.avatar-top-commentators {
vertical-align:middle;
border-radius: 30px;
}
.top-commentators .commenter-link-name {
padding-left:0;
}
</style>
<script type="text/javascript">
var maxTopCommenters = 8; 
var minComments = 1;     
var numDays = 0;         
var excludeMe = true;    
var excludeUsers = ["Anonymous", "someotherusertoexclude"]; 
var maxUserNameLength = 42;
//
var txtTopLine = '<b>[#].</b> [image] [user] ([count])';
var txtNoTopCommenters = 'No top commentators at this time.';
var txtAnonymous = '';
//
var sizeAvatar = 33;
var cropAvatar = true;
//
var urlNoAvatar = "https://blogger.googleusercontent.com/img/b/R29vZ2xl/AVvXsEioV3VLmVNsiXCrnTKRlF87omhNlaZa3lm44KOXEeJBfGNd3vVtORAY3gBUKJV4QCXus37P5DaMtrLUXLPPnAF6QEd1FlngMgmXDuorqDLhwYujSgzP0VMen7epwXTX1q5A4E1WXZQfJ26F/s1600/avatar_blue_m_96.png" + sizeAvatar;
var urlAnoAvatar = 'https://blogger.googleusercontent.com/img/b/R29vZ2xl/AVvXsEhFvNKU79IeXQ6hmk8ooJpVUf1chrDIczMaSDQw2za_doSDVDaM-QckXFHBVmVxYE10M5y_lFZZAKalvVO3kNoWcFLV360i9u2c0SmX_Dk3xK781vJV031y43XAiHOZcg2aYDjU9vsjOmf1/s1600/avatar1.png' + sizeAvatar;
var urlMyProfile = '';
var urlMyAvatar = '';
if(!Array.indexOf) {
 Array.prototype.indexOf=function(obj) {
  for(var i=0;i<this.length;i++) if(this[i]==obj) return i;
  return -1;
}}
function replaceTopCmtVars(text, item, position)
{
  if(!item || !item.author) return text;
  var author = item.author;
  var authorUri = "";
  if(author.uri && author.uri.$t != "")
    authorUri = author.uri.$t;
  var avaimg = urlAnoAvatar;
  var bloggerprofile = "http://www.blogger.com/profile/";
  if(author.gd$image && author.gd$image.src && authorUri.substr(0,bloggerprofile.length) == bloggerprofile)
    avaimg = author.gd$image.src;
  else {
    var parseurl = document.createElement('a');
    if(authorUri != "") {
      parseurl.href = authorUri;
      avaimg = 'http://www.google.com/s2/favicons?domain=' + parseurl.hostname;
    }
  }
  if(urlMyProfile != "" && authorUri == urlMyProfile && urlMyAvatar != "")
    avaimg = urlMyAvatar;
  if(avaimg == "http://img2.blogblog.com/img/b16-rounded.gif" && urlNoAvatar != "")
    avaimg = urlNoAvatar;
  var newsize="s"+sizeAvatar;
  avaimg = avaimg.replace(/\/s\d\d+-c\//, "/"+newsize+"-c/");
  if(cropAvatar) newsize+="-c";
  avaimg = avaimg.replace(/\/s\d\d+(-c){0,1}\//, "/"+newsize+"/");
  var authorName = author.name.$t;
  if(authorName == 'Anonymous' && txtAnonymous != '' && avaimg == urlAnoAvatar)
    authorName = txtAnonymous;
  var imgcode = '<img class="avatar-top-commentators" height="'+sizeAvatar+'" width="'+sizeAvatar+'" title="'+authorName+'" src="'+avaimg+'" />';
  if(authorUri!="") imgcode = '<a href="'+authorUri+'">'+imgcode+'</a>';
  if(maxUserNameLength > 3 && authorName.length > maxUserNameLength)
    authorName = authorName.substr(0, maxUserNameLength-3) + "...";
  var authorcode = authorName;
  if(authorUri!="") authorcode = '<a class="commenter-link-name" href="'+authorUri+'">'+authorcode+'</a>';
  text = text.replace('[user]', authorcode);
  text = text.replace('[image]', imgcode);
  text = text.replace('[#]', position);
  text = text.replace('[count]', item.count);
  return text;
}
var topcommenters = {};
var ndxbase = 1;
function showTopCommenters(json) {
  var one_day=1000*60*60*24;
  var today = new Date();
  if(urlMyProfile == "") {
    var elements = document.getElementsByTagName("*");
    var expr = /(^| )profile-link( |$)/;
    for(var i=0 ; i<elements.length ; i++)
      if(expr.test(elements[i].className)) {
        urlMyProfile = elements[i].href;
        break;
      }
  }
  if(json && json.feed && json.feed.entry && json.feed.entry.length) for(var i = 0 ; i < json.feed.entry.length ; i++ ) {
    var entry = json.feed.entry[i];
    if(numDays > 0) {
      var datePart = entry.published.$t.match(/\d+/g);
      var cmtDate = new Date(datePart[0],datePart[1]-1,datePart[2],datePart[3],datePart[4],datePart[5]);
   
      var days = Math.ceil((today.getTime()-cmtDate.getTime())/(one_day));
      if(days > numDays) break;
    }
    var authorUri = "";
    if(entry.author[0].uri && entry.author[0].uri.$t != "")
      authorUri = entry.author[0].uri.$t;
    if(excludeMe && authorUri != "" && authorUri == urlMyProfile)
      continue;
    var authorName = entry.author[0].name.$t;
    if(excludeUsers.indexOf(authorName) != -1)
      continue;
    var hash=entry.author[0].name.$t + "-" + authorUri;
    if(topcommenters[hash])
      topcommenters[hash].count++;
    else {
      var commenter = new Object();
      commenter.author = entry.author[0];
      commenter.count = 1;
      topcommenters[hash] = commenter;
    }
  }
  if(json && json.feed && json.feed.entry && json.feed.entry.length && json.feed.entry.length == 200) {
    ndxbase += 200;
    document.write('<script type="text/javascript" src="http://'+window.location.hostname+'/feeds/comments/default?redirect=false&max-results=200&start-index='+ndxbase+'&alt=json-in-script&callback=showTopCommenters"></'+'script>');
    return;
  }
  // convert object to array of tuples
  var tuplear = [];
  for(var key in topcommenters) tuplear.push([key, topcommenters[key]]);
  tuplear.sort(function(a, b) {
    if(b[1].count-a[1].count)
        return b[1].count-a[1].count;
    return (a[1].author.name.$t.toLowerCase() < b[1].author.name.$t.toLowerCase()) ? -1 : 1;
  });
  var realcount = 0;
  for(var i = 0; i < maxTopCommenters && i < tuplear.length ; i++) {
    var item = tuplear[i][1];
    if(item.count < minComments)
        break;
    document.write('<di'+'v class="top-commentators">');
    document.write(replaceTopCmtVars(txtTopLine, item, realcount+1));
    document.write('</d'+'iv>');
    realcount++;
  }
  if(!realcount)
    document.write(txtNoTopCommenters);
}
document.write('<script type="text/javascript" src="http://'+window.location.hostname+'/feeds/comments/default?redirect=false&max-results=200&alt=json-in-script&callback=showTopCommenters"></'+'script>');
</script>
3. Now you just have to save changes and you're done!

Configuration

- To modify the number of users displayed in the gadget, look for var maxTopCommenters = 8; and change 8 with any number you want.
- To change the avatar size of the commenters, look for var sizeAvatar = 33; and change number 33 with the number of pixels you want. - To hide your name or some other username, replace the someotherusertoexclude text between the quotes (to add more, add another comma after the text in red, then type the username you want to exclude between the quotes)