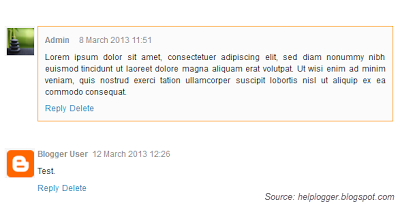
In this tutorial we will learn how to highlight the author comments so that they will have a different background color, border, or anything that makes them stand out from the others. To achieve this, we need to add a code in the Blogger's template and to modify the style according to our preferences.
Step 2. Click anywhere inside the code area and try to find - using CTRL + F keys - this tag:
Step 3. Just above it, paste the following code:
Border:
The line marked in orange represents the border's style.
What it can be done:
The line marked in blue represents the background's style. You can use a plain color or an image. By default there's a combination of both (a white transparent image with a gray plain color).
To change/add:
Font Color:
To change the font's color, replace the #444444 color value in green with your own. (you can use this tool to find the hex code of your desired color)
Font Size:
Modify the value in red by increasing/decreasing the "12" value in order to change the size of text.
Step 4. Now Save your Template.
To customize the entire style of threaded comments, please check my previous tutorial on How to Customize Comment's Background, Font Color and Border in Blogger.
How to highlight author comments in Blogger:
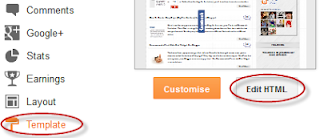
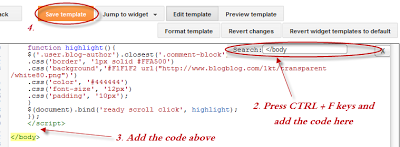
Step 1. Go to Template, click on Edit HTMLStep 2. Click anywhere inside the code area and try to find - using CTRL + F keys - this tag:
</body>
Screenshot:
Step 3. Just above it, paste the following code:
<script src='http://code.jquery.com/jquery-latest.js'/>
<script>
$(function() {
function highlight(){
$('.user.blog-author').closest('.comment-block')
.css('border', '1px solid #FFA500')
.css('background','#F1F1F2 url("http://www.blogblog.com/1kt/transparent/white80.png")')
.css('color', '#444444')
.css('font-size', '12px')
.css('padding', '10px');
}
$(document).bind('ready scroll click', highlight);
});
</script>
Customizing the Author Comments:
Border:
The line marked in orange represents the border's style.
What it can be done:
- 1px - you can increase the value to change the border's thickness
- solid - change the border's style to dotted, dashed, inset, outset etc.
- #FFA500 - this is the border's color value, change it with your own color
The line marked in blue represents the background's style. You can use a plain color or an image. By default there's a combination of both (a white transparent image with a gray plain color).
To change/add:
- a different color: replace the #F1F1F2 value with your own (use this tool to find the hex code of your desired color)
- an image: replace the defaul url http://www.blogblog.com/1kt/transparent/white80.png with that of your image
Font Color:
To change the font's color, replace the #444444 color value in green with your own. (you can use this tool to find the hex code of your desired color)
Font Size:
Modify the value in red by increasing/decreasing the "12" value in order to change the size of text.
Step 4. Now Save your Template.
To customize the entire style of threaded comments, please check my previous tutorial on How to Customize Comment's Background, Font Color and Border in Blogger.


thank you for giving a good script for my comments box, and now author commentary was more beautiful.
ReplyDeleteYou're welcome.
Deletethats amazing
DeleteThat was very useful, I have been wondering why mine is not having different colors, I never knew it only be gotten from this hack. Thank for sharing this.
ReplyDeleteRegards WorldWebSurfers.com
MANY THANKS.. Done..
ReplyDeleteImplemented on my blog, thanks
ReplyDeletethanx.. do you know how to add "Admin" or "Author" tag to admin's comments??
ReplyDeleteThanks for your nice post....I was actually looking for it...You might solve my problem....Just one question....will this hack work in new template style of blogger???
ReplyDeleteRegards,
Aditya Dey of Latest Current Affairs
Amazing trix, I will apply this one in my blog too.Thanks!
ReplyDeleteHow to make my site popular.please help
ReplyDeleteThank you for your tutorial. it did not work for me. could it be because I reply to comment using my google account?
ReplyDeleteThank you for the tutorial. It's worked for me fine.
ReplyDeleteNext time thank you. I have done it and all is OK.
ReplyDeleteworked out ! thanks :D
ReplyDelete