This simple trick will help you modify the avatars size in Blogger comments whose default size is of 36px... pretty small considering that a lot of sites these days are using much larger avatars. To change the style and size of avatars is very easy - you just need to add the CSS code in your Blogger template that will make size of avatars to have width and height of 64px.

Step 1. Go to Dashboard - Template - click on the Edit HTML button
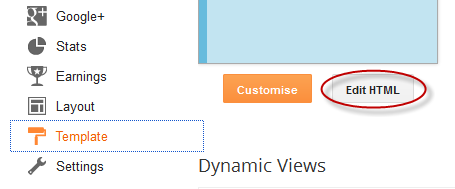
...click anywhere inside the code area and press CTRL + F to open the blogger' search box
Step 2. Type or paste this tag inside the search box and hit Enter to find it:
[Works in Blogger threaded comment system]
Step 4. Cick on the Save template button to apply the changes.
That's it. Now the Blogger comments avatars should look bigger.
Step 1. Go to Dashboard - Template - click on the Edit HTML button
...click anywhere inside the code area and press CTRL + F to open the blogger' search box
Step 2. Type or paste this tag inside the search box and hit Enter to find it:
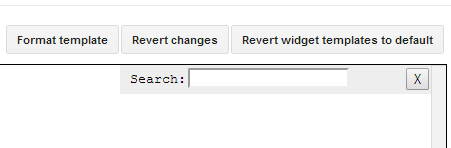
]]></b:skin>
Note: you may need to click on the arrow next to it and then search this tag again
Step 3. Depending on which comment system you use (with reply/no reply), copy and paste one of the following codes just above it:[Works in Blogger threaded comment system]
.comments .avatar-image-container{[for old blogger commenting system]
background-color: rgb(34, 34, 34);
border:1px solid #ccc;
margin: 0px 10px 0px 0px;
padding: 0px 0px 0px 0px;
width: 64px;
max-height: 64px;
}
.comments .avatar-image-container img{
margin: 0px 0px 0px 0px;
padding: 0px 0px 0px 0px;
max-width: 64px;
height: 64px;
}
.avatar-image-container{Note: For bigger/smaller avatars, change the values in red. To change the anonymous avatar, replace the URLs in blue with your own. (works only for the old commenting system i.e. that has no reply option)
border:1px solid #d6d6d6;
margin-left: -30px;
-moz-border-radius: 4px;
background:#fff;
height:70px;
min-height: 70px;
width:70px;
min-width:70px;
}
.avatar-image-container img {
background: url(https://blogger.googleusercontent.com/img/b/R29vZ2xl/AVvXsEgaWT6s6VDGkbujihN_hEOnVriWptHkdqK4TyXrySuFq3FSLIKZf8fw77y_Uhlt62GSw64QdpgmYsrBQjsjzEN4i1zAmqU2vNhoWswG2D4CETGNAX4CcKsKRdo4aYzUnQmQLOe5RnCG28w/s200/anonymous.jpg);
background-repeat: no-repeat;
background-position: center;
background-size: 100%;
width:70px;
min-width:70px;
height:70px;
min-height:70px;
}
Step 4. Cick on the Save template button to apply the changes.
That's it. Now the Blogger comments avatars should look bigger.
very god
ReplyDeletegood
ReplyDeleteok
ReplyDeletecan u please tell me how you add this comment style on your blog i also want to add this.
ReplyDeletewww.dynamictrick.in
Wow! This information was truly valuable to me. Ill be coming back to your blog.
ReplyDeleteI have seen in many blog they have written their blog id on photo .......and posted how to do this
ReplyDelete1 how to wirte name of your blog or id on photo and post to blog
2 my blog acoount is not getting registerd in word ;whats the reason
how to write blog id on photo/image and post in blog
ReplyDeleteGreat! Thanks!
ReplyDeletenice post and nice blog
ReplyDeleteThis majestic, I strongly believe it will work. Keep the good work sir.
ReplyDelete