It has often been said that a picture says a thousand words, so in the struggle for the reader's attention, we can add a picture or icon next to the post titles, as I have added on the left of the post title - see the screenshot below.
 Step 1. First thing you have to do is to prepare an image. After that, you'll need a direct link to the image before you proceed further. You can upload it to tinypic.com and then copy the URL located in the Direct Link for Layouts box. Also, make sure your image is sized appropriately. You don't want to see a huge image next to your post title.
Step 2. Go to Dashboard, "Template" and click the "Edit HTML" button.
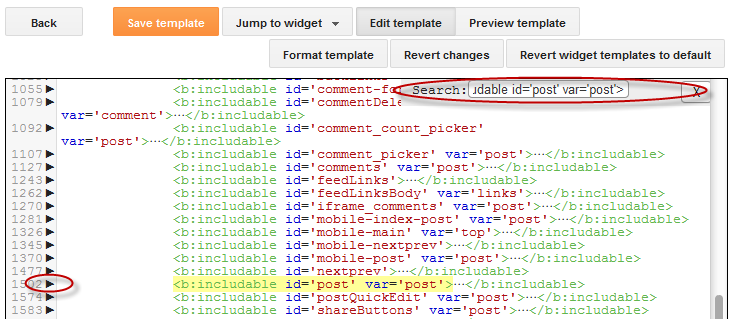
Step 3. Click anywhere inside the code area to find (using CTRL + F) the following code:
Step 5. Then delete it until you see <div class='post-header'>
Step 6. Paste the following code instead of the deleted code from step 5:
Step 7. Replace the IMAGE-URL text from above with the URL of your image (the one that you've gotten from Step 1).
Step 8. Save the Template and this is how you can add an image next to the Blogger Post title. Enjoy!
Show Image Icon before Blogger Post Title
Step 2. Go to Dashboard, "Template" and click the "Edit HTML" button.
Step 3. Click anywhere inside the code area to find (using CTRL + F) the following code:
<b:includable id='post' var='post'>Step 4. After you found it, click on the left arrow next to it to expand the HTML code
Step 5. Then delete it until you see <div class='post-header'>
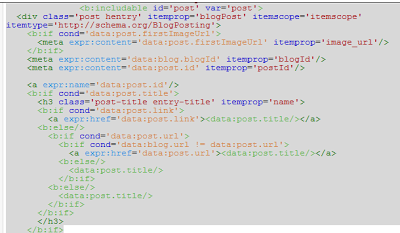
<b:includable id='post' var='post'>The code that needs to be deleted:
<div class='post hentry' itemprop='blogPost' itemscope='itemscope' itemtype='http://schema.org/BlogPosting'>
<b:if cond='data:post.firstImageUrl'>
<meta expr:content='data:post.firstImageUrl' itemprop='image_url'/>
</b:if>
<meta expr:content='data:blog.blogId' itemprop='blogId'/>
<meta expr:content='data:post.id' itemprop='postId'/>
<a expr:name='data:post.id'/>
<b:if cond='data:post.title'>
<h3 class='post-title entry-title' itemprop='name'>
<b:if cond='data:post.link'>
<a expr:href='data:post.link'><data:post.title/></a>
<b:else/>
<b:if cond='data:post.url'>
<b:if cond='data:blog.url != data:post.url'>
<a expr:href='data:post.url'><data:post.title/></a>
<b:else/>
<data:post.title/>
</b:if>
<b:else/>
<data:post.title/>
</b:if>
</b:if>
</h3>
</b:if>
Step 6. Paste the following code instead of the deleted code from step 5:
<b:includable id='post' var='post'>
<div class='post hentry' itemprop='blogPost' itemscope='itemscope' itemtype='http://schema.org/BlogPosting'>
<b:if cond='data:post.firstImageUrl'>
<meta expr:content='data:post.firstImageUrl' itemprop='image_url'/>
</b:if>
<meta expr:content='data:blog.blogId' itemprop='blogId'/>
<meta expr:content='data:post.id' itemprop='postId'/>
<a expr:name='data:post.id'/>
<b:if cond='data:post.title'>
<table><tr>
<td class='posttitle'>
<img src='IMAGE-URL'/></td>
<td><h3 class='post-title entry-title' itemprop='name'>
<b:if cond='data:post.link'>
<a expr:href='data:post.link'><data:post.title/></a>
<b:else/>
<b:if cond='data:post.url'>
<b:if cond='data:blog.url != data:post.url'>
<a expr:href='data:post.url'><data:post.title/></a>
<b:else/>
<data:post.title/>
</b:if>
<b:else/>
<data:post.title/>
</b:if>
</b:if>
</h3>
</td>
</tr></table>
<style>
h3.post-title {
margin: 0px !important;
}
</style>
</b:if>
Step 7. Replace the IMAGE-URL text from above with the URL of your image (the one that you've gotten from Step 1).
Step 8. Save the Template and this is how you can add an image next to the Blogger Post title. Enjoy!
Hello can you help me on how to transfer the next and back in the center of my blogger post..thanks..
ReplyDeletehere is my blog..
pinoy meme
can i get different images for different posts...?
ReplyDeleteHi,
ReplyDeleteThis coding works in Chrome but not the image does not show up in IE. Please help.
Thanks,
Deepti.
Hi,
ReplyDeleteThis works in Chrome but when I open my blog in IE the image doesnot show up. I have the IE9 browser. Can u pls help?
Hello , i have problem with integrated this in my blog template...When i paste this code in my html and try to save it i have error:
ReplyDeleteError parsing XML, line 1156, column 5: The element type "b:includable" must be terminated by the matching end-tag "".
i do that and after that another error for not closed div after i close it another error for bif widget ...
how to solve this ....Thnks....
I try this on my blog but it doesn't work, how come? can you help me
ReplyDeletethis worked soooo good until blogger updated their html editor. Could you please update this tutorial too?
ReplyDeleteOk, done it :)
Deletehow to put my picture as header background??
ReplyDeleteI want to change size of image thumnail from home page. The image thumnail crop not exactly and look not good like the original image. I want it just scale the image not crop the image. Can anyone help me to solve this problem.
ReplyDeletehttp://vietnamradio.info
Hey, thanks so much. It worked perfectly. ;)
ReplyDeleteIt worked awesome for me too. Thank you so much for the big help :)
ReplyDeletewww.marssyreese.com
hii admin please help me look in the image http://imgur.com/q61fm5I i want that my post title should be down after each post image
ReplyDeleteplease i came here with so many hopes.
Its working awesome but how to add image only inside the post, not on home page.
ReplyDeleteBest Regards